❓ Train a QnA model with transformers and Argilla#
At least once, you have probably found yourself in a situation where you need an answer to quite a specific question from Google. Chances are that Google gave you a response in bold letters (“How much does the Eiffel Tower weigh? - 10,100 tons) or that Google only highlighted some text from the results (”What was the original color of the Statue of Liberty?“). Either way, Google used a specific algorithm that does the finding-the-answer job for you and saved you from reading a bunch of pages or using Ctrl+F. Although not confirming the reliability of the pages or the pieces of information found, it managed to come up with an exact answer to the question (it incorrectly highlights”blue-green” for the Statue of Liberty at the time of this post). This task -finding the exact answer in a piece of text for a given question- is called extractive question answering and it is one of the main pipelines of the many QnA or LLM systems today. In this blogpost, we will see how we can use Argilla to create an end-to-end pipeline for extractive QnA.
Here are the steps we will follow:
Create a dataset for extractive QnA
Add suggestions to the dataset
Push to Argilla and annotate
Define the model
Implement
ArgillaTrainerTrain the model
Make predictions
Introduction#
Question answering (QnA) tasks are mainly divided into two: extractive QnA and generative QnA. Generative QnA (or abstractive QnA) is the task where the QnA system generates human-like, natural language answers to a question. For this, a generative QnA system uses a retriever-generator architecture instead of a retriever-reader one, which is employed by an extractive QnA. As it requires a deeper understanding of the text and natural language generation, generative models are yet to catch the extractive ones in terms of performance as of today. However, as it offers a more sophisticated pipeline and output, it will have much more to offer in the future.
On the other hand, the task we have just seen above was an example of the extractive QnA, where a model finds the exact span within a text that will be used as an answer to the given question. In this sense, this task formally consists of a tuple of (q,c,a) and the objective of training is to minimize the loss between -log(Pstart) and -log(Pend), where Pstart and Pend are the probabilities of the start and end indices of the answer span.
Argilla offers all the necessary tools from the start to the end of such a pipeline. We will use Argilla to annotate our dataset and use ArgillaTrainer to train the QnA model. ArgillaTrainer offers a smooth integration with transformers, which will allow you to implement your whole training process within the trainer itself. Let us first start by installing the required libraries and importing the necessary modules.
Running Argilla#
For this tutorial, you will need to have an Argilla server running. There are two main options for deploying and running Argilla:
Deploy Argilla on Hugging Face Spaces: If you want to run tutorials with external notebooks (e.g., Google Colab) and you have an account on Hugging Face, you can deploy Argilla on Spaces with a few clicks:

For details about configuring your deployment, check the official Hugging Face Hub guide.
Launch Argilla using Argilla’s quickstart Docker image: This is the recommended option if you want Argilla running on your local machine. Note that this option will only let you run the tutorial locally and not with an external notebook service.
For more information on deployment options, please check the Deployment section of the documentation.
Tip
This tutorial is a Jupyter Notebook. There are two options to run it:
Use the Open in Colab button at the top of this page. This option allows you to run the notebook directly on Google Colab. Don’t forget to change the runtime type to GPU for faster model training and inference.
Download the .ipynb file by clicking on the View source link at the top of the page. This option allows you to download the notebook and run it on your local machine or on a Jupyter notebook tool of your choice.
Install Dependencies#
Let us install the dependencies first.
[ ]:
%pip install argilla transformers datasets evaluate
And then import the necessary modules.
[1]:
import argilla as rg
from datasets import load_dataset
from argilla.feedback import ArgillaTrainer, TrainingTask
from transformers import pipeline, AutoTokenizer, AutoModelForQuestionAnswering
import torch
Initialize the Argilla client with the init function. If you are running Argilla on a public HF Space, you can change api_url to your Spaces URL.
[4]:
# Replace api_url with the url to your HF Spaces URL
# Replace api_key with the default or custom API key
# Replace workspace with the name of your workspace
rg.init(
    api_url="http://localhost:6900",
    api_key="argilla.apikey",
    workspace="argilla",
)
If you’re running a private Hugging Face Space, you will also need to set the HF_TOKEN as follows:
[ ]:
# # Set the HF_TOKEN environment variable
# import os
# os.environ['HF_TOKEN'] = "your-hf-token"

# # Replace api_url with the url to your HF Spaces URL
# # Replace api_key if you configured a custom API key
# # Replace workspace with the name of your workspace
# rg.init(
#     api_url="https://[your-owner-name]-[your_space_name].hf.space",
#     api_key="owner.apikey",
#     workspace="admin",
#     extra_headers={"Authorization": f"Bearer {os.environ['HF_TOKEN']}"},
# )
Enable Telemetry#
We gain valuable insights from how you interact with our tutorials. To improve ourselves in offering you the most suitable content, using the following lines of code will help us understand that this tutorial is serving you effectively. Though this is entirely anonymous, you can choose to skip this step if you prefer. For more info, please check out the Telemetry page.
[ ]:
try:
    from argilla.utils.telemetry import tutorial_running
    tutorial_running()
except ImportError:
    print("Telemetry is introduced in Argilla 1.20.0 and not found in the current installation. Skipping telemetry.")
Create the Dataset#
As the first step in our QnA pipeline, we will need a dataset annotated by our annotators. For this, we will need to create a dataset where there is a question and context to search for the answer within. Our annotators will construct the answers by giving answers to the questions from the context. For this tutorial, we will use the squad dataset, which is a popular dataset for extractive QnA. We will firstly ignore the answers and load the
question-context pairs from squad to Argilla to showcase the annotation process. We will use the datasets library to download the dataset. Let us create the dataset and see how it is structured.
[63]:
dataset_hf = load_dataset("squad", split="train")
dataset_hf
[63]:
Dataset({
    features: ['id', 'title', 'context', 'question', 'answers'],
    num_rows: 87599
})
Our dataset consists of context-question-answer triplets along with id and title for each data item. In your own dataset, you too may consider working with ids for each data item as it will help with data organization especially in pre- and post-training. A total of 87599 items are included in this dataset, which is quite a good number for training a QnA model.
And let us have a look at one of the data items we have before starting the annotation process.
[64]:
dataset_hf[0]
[64]:
{'id': '5733be284776f41900661182',
 'title': 'University_of_Notre_Dame',
 'context': 'Architecturally, the school has a Catholic character. Atop the Main Building\'s gold dome is a golden statue of the Virgin Mary. Immediately in front of the Main Building and facing it, is a copper statue of Christ with arms upraised with the legend "Venite Ad Me Omnes". Next to the Main Building is the Basilica of the Sacred Heart. Immediately behind the basilica is the Grotto, a Marian place of prayer and reflection. It is a replica of the grotto at Lourdes, France where the Virgin Mary reputedly appeared to Saint Bernadette Soubirous in 1858. At the end of the main drive (and in a direct line that connects through 3 statues and the Gold Dome), is a simple, modern stone statue of Mary.',
 'question': 'To whom did the Virgin Mary allegedly appear in 1858 in Lourdes France?',
 'answers': {'text': ['Saint Bernadette Soubirous'], 'answer_start': [515]}}
squad is a dataset of question-context-answer triplets pulled from Wikipedia articles. As seen in the title field above, each data item comes from a specific Wikipedia article. The context field contains the text of the article, question contains the question to be answered, and answers contains the answer span within the context, which are already annotated by humans. The answer_start is the starting index of the answer within the context given. We will ignore the
answers field for now and only use the context and question fields.
Create FeedbackDataset#
Let us create our FeedbackDataset and add the data items from squad. To create a FeedbackDataset, we will use the task templates from Argilla, which makes the process much easier for any NLP task. You can have more info about the task templates from here.
[16]:
dataset = rg.FeedbackDataset.for_question_answering()
This method has just created the basic QnA task template for us with context and question fields along with the answer question which will be used by the annotators to construct the answer.
Now that we have our dataset ready, we can add the data items from squad to our dataset as records by adding suggestions for each one as well.
Add Suggestions#
To help our annotators and make the annotation process faster, we can add suggestions to our dataset. Suggestions are model predictions for our data items that will be shown on Argilla UI during the annotation process. As it is optional, depending on your project, it will gain you a lot of time. You can use any model of your preference to generate model predictions for your dataset. We will be using deepset/electra-base-squad2 for demonstration purposes here. We can utilize the pipeline
function from transformers to make things easier.
[17]:
question_answerer = pipeline("question-answering", model="deepset/electra-base-squad2")
Let us create the records from our dataset by also adding suggestions to each item.
[18]:
records = [
    rg.FeedbackRecord(
        fields={
            "question": item["question"],
            "context": item["context"],
        },
        suggestions=[
            {"question_name": "answer",
            "value": question_answerer(question=item["question"], context=item["context"])["answer"]},
        ]
    ) for item in dataset_hf
]
And add the records to our dataset.
[19]:
dataset.add_records(records)
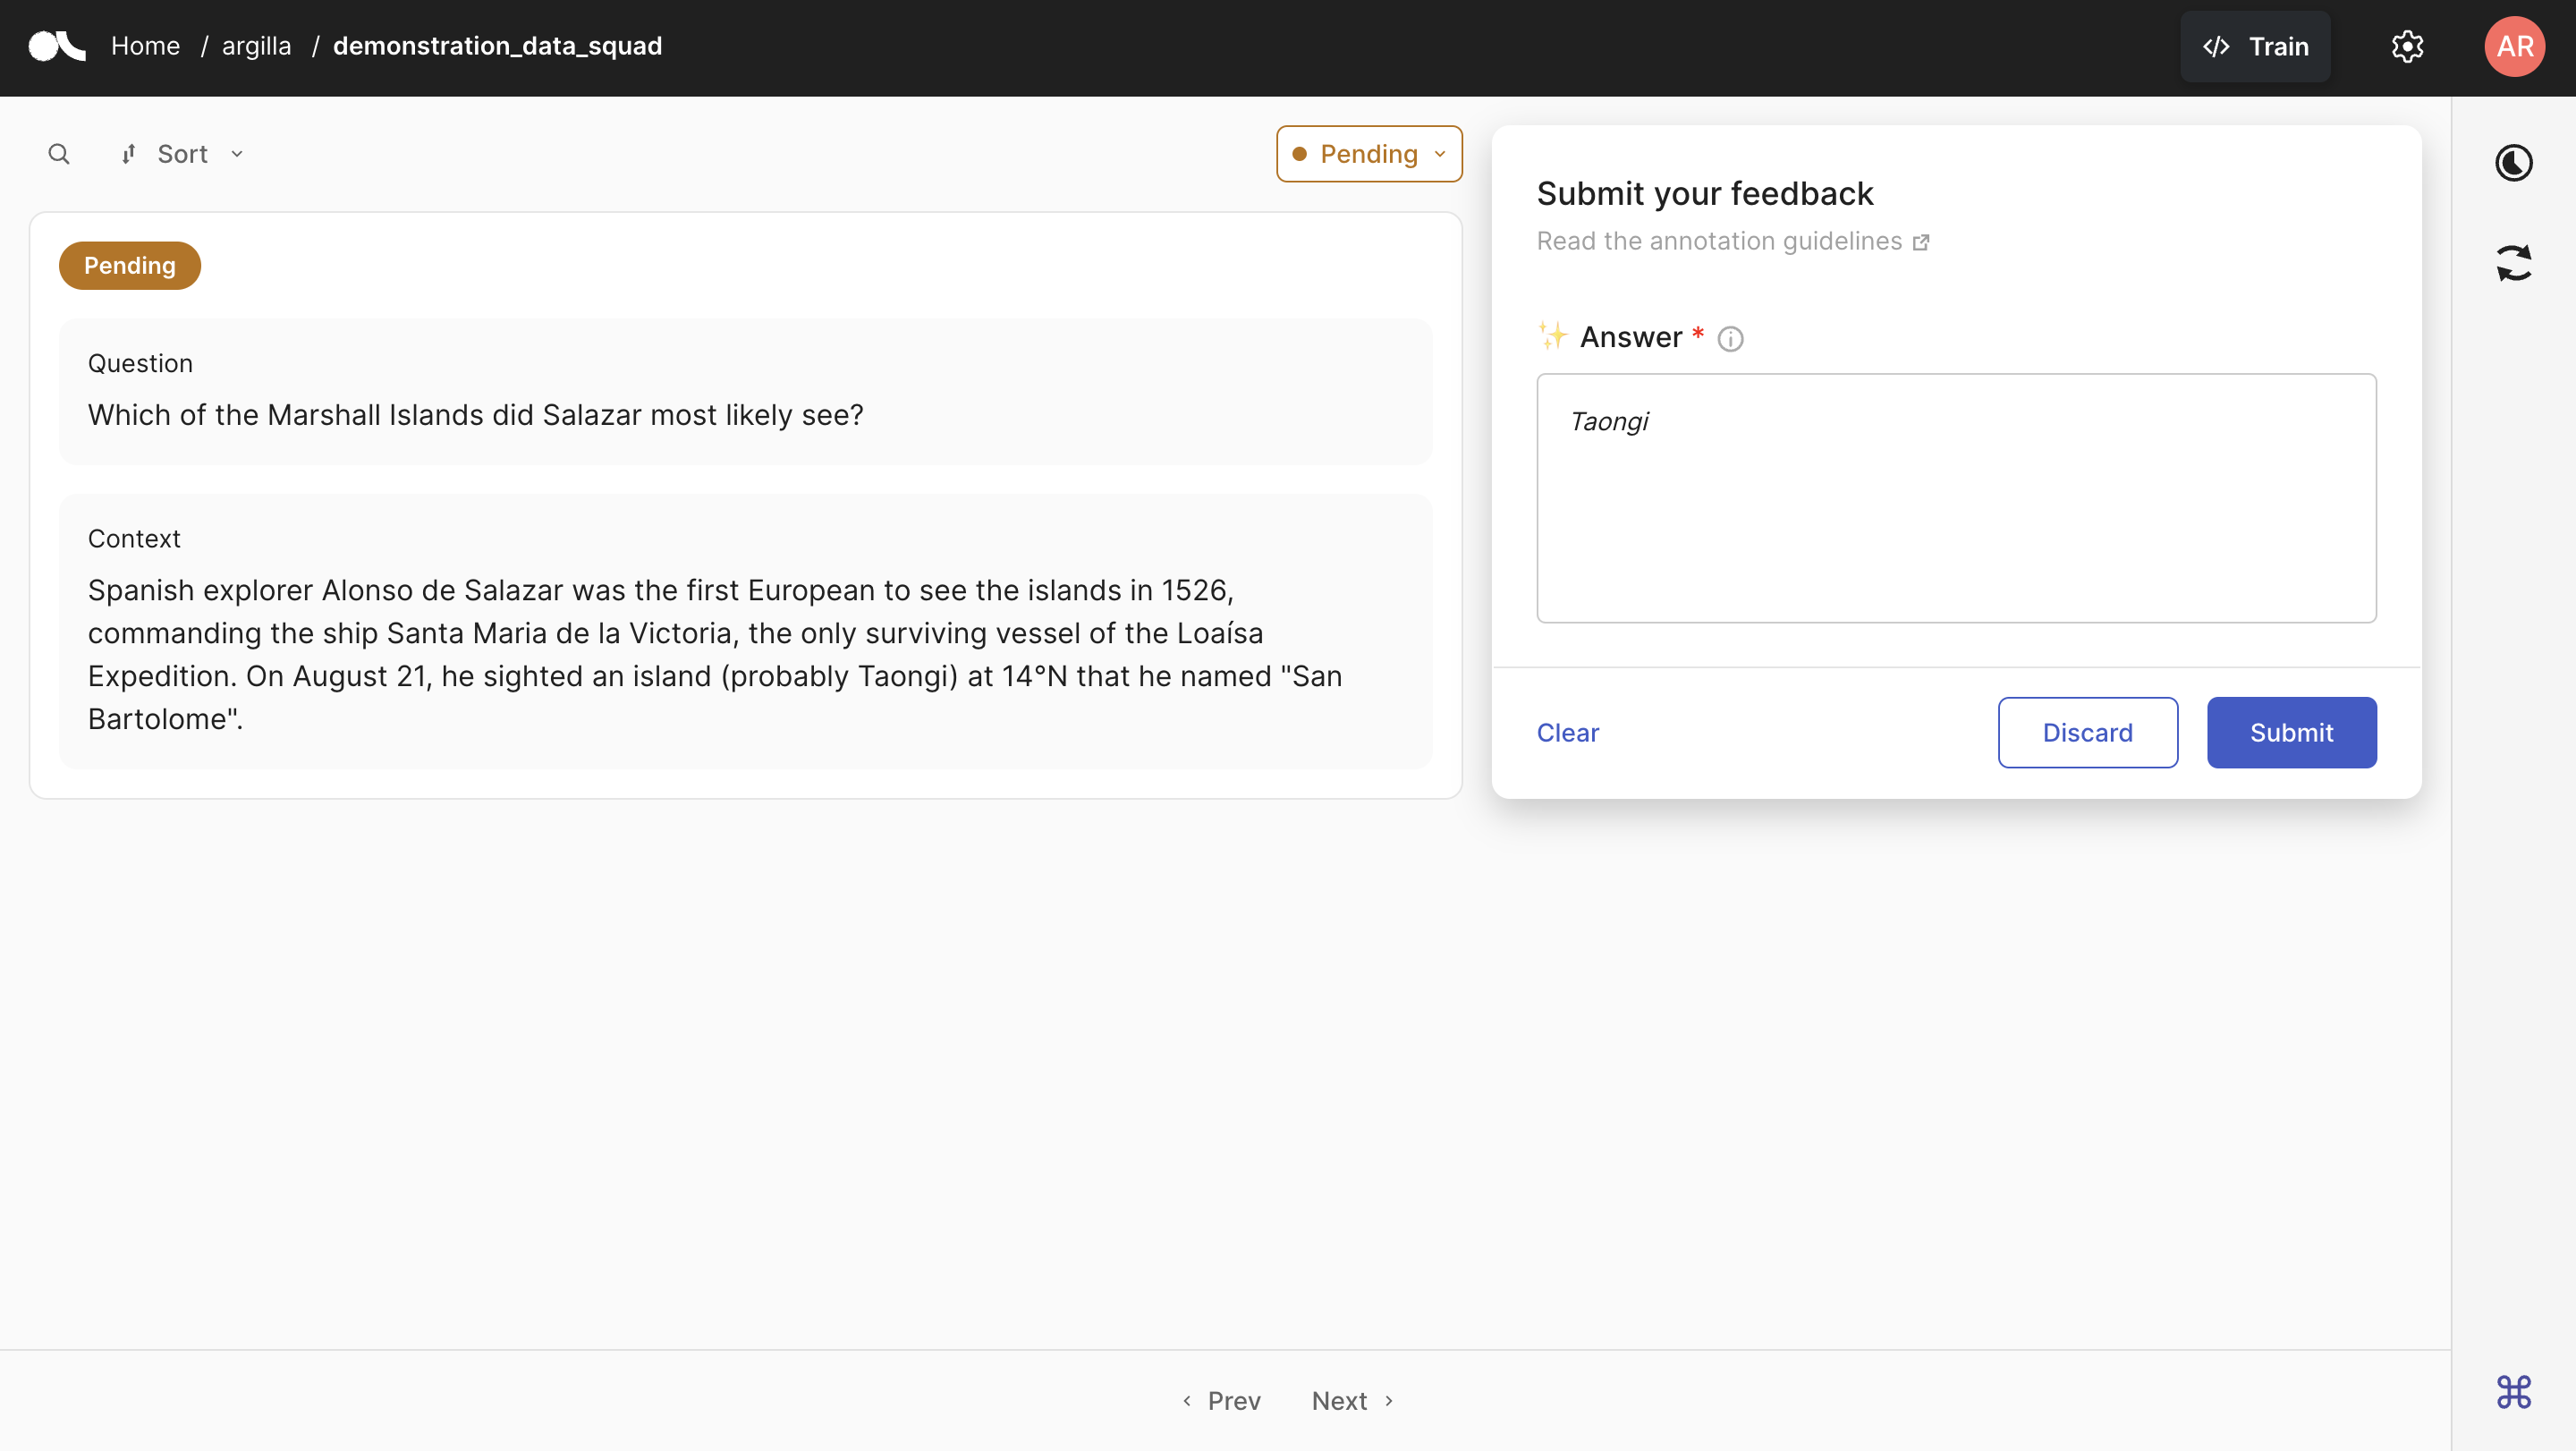
Annotation on Argilla#
We can now upload our dataset to Argilla for our annotators to annotate. They will annotate each item by writing the answer span in the answer field by using the model hints, if you have opted for the suggestions. If you would like to have more control over the annotation process and manipulate some other features, you can refer to our Argilla UI page more info.
[20]:
remote_dataset = dataset.push_to_argilla(name="demonstration_data_squad", workspace="argilla")
Below is the Argilla interface where annotators will annotate the data items. The question-context pairs that we uploaded are seen on the left. To the right, there is the annotation panel where annotators will write down their answers. In the Answer box, we also see that the suggestions we uploaded are written in italic letters, which will help the annotators in their annotation process.
Train the Model#
After the annotation work is done, we can download our annotated dataset. Note that the dataset downloaded by the from_argilla function is a remote dataset object, meaning that any change you make is directly reflected on the remote dataset.
[33]:
annotated_dataset = rg.FeedbackDataset.from_argilla("demonstration_data_squad", workspace="argilla")
Before continuing with training, let us check the annotations we obtained. Manually checking some annotations will give us an idea about the quality of the annotations and the dataset itself.
[62]:
item = annotated_dataset[3]
print(f"Question: {item.fields['question']}\nContext: {item.fields['context']}\nAnnotated Answer: {item.responses[0].values['answer'].value}")
Question: To somewhat avoid the water vapor in the atmosphere, where can an observatory be sited?
Context: The sensitivity of Earth-based infrared telescopes is significantly limited by water vapor in the atmosphere, which absorbs a portion of the infrared radiation arriving from space outside of selected atmospheric windows. This limitation can be partially alleviated by placing the telescope observatory at a high altitude, or by carrying the telescope aloft with a balloon or an aircraft. Space telescopes do not suffer from this handicap, and so outer space is considered the ideal location for infrared astronomy.
Annotated Answer: at a high altitude
Note
The main motivation behind Extractive QnA is to find the exact answer piece within the given text. This is why the answers must be exactly included in the contexts given. So, it is highly advisable to check if the answers include typos or not. Our model will pass over the items whose answers are not included in the context.
Now, let us define the model and the tokenizer we will be using. We will use distilbert-base-uncased-distilled-squad for demonstration purposes here and fine-tune it with the dataset that we have had annotated by our annotators.
[ ]:
model_name = "distilbert-base-uncased-distilled-squad"
tokenizer = AutoTokenizer.from_pretrained(model_name)
model = AutoModelForQuestionAnswering.from_pretrained(model_name)

if torch.cuda.is_available():
    device = torch.device("cuda")
    print(f"Using {torch.cuda.get_device_name(0)}")
else:
    device = torch.device("cpu")
    print("No GPU available, using CPU instead.")
Implement the ArgillaTrainer#
Now that we have our dataset ready, we can start training our model. For this, we will use the ArgillaTrainer class from Argilla. ArgillaTrainer is a wrapper around various frameworks and offers a smooth integration between them and Argilla. It allows you to train your model on Argilla with a few lines of code. You can have more information on ArgillaTrainer from here.
We first need to define the task that will be used by the ArgillaTrainer. The TrainingTask class offers various tasks for different NLP tasks and we will use the for_question_answering method to create our task. We also create a formatting_func for our task, which will process our dataset according to what the model requires.
Please note that we are not computing the answer spans out of the answers given by our annotators. This is because ArgillaTrainer will itself calculate the answer start and end indices from the answers given by the annotators. This is one of the main advantages of using ArgillaTrainer as it will save you from the hassle of computing the answer spans yourself.
[23]:
def formatting_func(sample):
    question = sample["question"]
    context = sample["context"]
    for answer in sample["answer"]:
        if not all([question, context, answer["value"]]):
            continue
        yield question, context, answer["value"]

task = TrainingTask.for_question_answering(formatting_func=formatting_func)
With the task ready, we can now create the ArgillaTrainer instance. Note that we need to define our framework inside the trainer and we will be using transformers here. In case of not having a model fed to the trainer, the trainer will use a default model for the task. We pass the model that is defined above to the trainer. Also, we tell the model that the training size will be 0.7.
[ ]:
trainer = ArgillaTrainer(
    dataset=annotated_dataset,
    task=task,
    model=model,
    framework="transformers",
    train_size=0.7,
    tokenizer=tokenizer,
)
You have the opportunity to change the trainer configurations after the initialization with the update_config method. Let us further configure our training process.
[ ]:
trainer.update_config(
    learning_rate = 4e-2,
    weight_decay = 0.01,
    max_grad_norm = 1,
    num_train_epochs = 3,
    logging_strategy = "steps",
    save_strategy = "steps",
    save_steps = 100,
)
We can now train the model with the train method.
[ ]:
trainer.train("./my_qna_model")
Inference#
Now that we have our model trained, we can use it to find the answer span for a given question and context. We can use the pipeline function from transformers to make things easier. It will give us the answer as well as the start and end indices of the answer span.
[29]:
qna_pipeline = pipeline(
    "question-answering",
    model="my_qna_model",
    tokenizer=tokenizer,
    device=device
)
We just need the feed the function with the question and context to get the answer.
[28]:
qna_pipeline(question="For what is Venezuela famous?", context="Venezuela is known for its natural beauty.")
[28]:
{'score': 0.6827161908149719,
 'start': 27,
 'end': 41,
 'answer': 'natural beauty'}
In this tutorial, we have seen how we can use Argilla to create an end-to-end pipeline for extractive QnA. We have first created a dataset for extractive QnA and added suggestions to it. Then, we have pushed the dataset to Argilla and annotated it. After that, we have defined the model and implemented the ArgillaTrainer to train the model. Finally, we have made predictions with the trained model. For more tutorials on other uses of Argilla and ArgillaTrainer, please refer to our
tutorials page.