🔫 Zero-shot and few-shot classification with SetFit#
In this tutorial, you’ll learn to use Sentence Transformer embeddings and SetFit’s zero-shot and few-shot capabilities to make data labeling significantly faster. It will walk you through the following steps:
💾 Use sentence transformers to generate embeddings of a dataset with banking customer requests.
🔫 Use SetFit’s zero-shot classifier and upload its predictions together with the embeddings.
🏷 Leverage similarity search and pre-annotated examples to efficiently label bulks of semantically related, high-impact examples.
🦾 Train a few-shot SetFit model to improve the results of the zero-shot model.
Introduction#
In this tutorial, we’ll use the power of embeddings to make data labeling (and curation) more efficient. Combined with SetFit’s zero and few-shot capabilities, this approach will greatly reduce the time to get a good quality model with your own data.
Let’s do it!
Running Argilla#
For this tutorial, you will need to have an Argilla server running. There are two main options for deploying and running Argilla:
Deploy Argilla on Hugging Face Spaces: If you want to run tutorials with external notebooks (e.g., Google Colab) and you have an account on Hugging Face, you can deploy Argilla on Spaces with a few clicks:

For details about configuring your deployment, check the official Hugging Face Hub guide.
Launch Argilla using Argilla’s quickstart Docker image: This is the recommended option if you want Argilla running on your local machine. Note that this option will only let you run the tutorial locally and not with an external notebook service.
For more information on deployment options, please check the Deployment section of the documentation.
Tip
This tutorial is a Jupyter Notebook. There are two options to run it:
Use the Open in Colab button at the top of this page. This option allows you to run the notebook directly on Google Colab. Don’t forget to change the runtime type to GPU for faster model training and inference.
Download the .ipynb file by clicking on the View source link at the top of the page. This option allows you to download the notebook and run it on your local machine or on a Jupyter notebook tool of your choice.
Setup#
For this tutorial, you’ll need Argilla’s Python client and a few third-party libraries that can be installed via pip:
[ ]:
%pip install argilla datasets==2.8.0 sentence-transformers==2.2.2 setfit==0.6.0 plotly==4.1.0 -qqq
Let’s import the Argilla module for reading and writing data:
[1]:
import argilla as rg
If you are running Argilla using the Docker quickstart image or Hugging Face Spaces, you need to init the Argilla client with the URL and API_KEY:
[2]:
# Replace api_url with the url to your HF Spaces URL if using Spaces
# Replace api_key if you configured a custom API key
rg.init(
    api_url="http://localhost:6900",
    api_key="admin.apikey"
)
If you’re running a private Hugging Face Space, you will also need to set the HF_TOKEN as follows:
[ ]:
# # Set the HF_TOKEN environment variable
# import os
# os.environ['HF_TOKEN'] = "your-hf-token"

# # Replace api_url with the url to your HF Spaces URL
# # Replace api_key if you configured a custom API key
# rg.init(
#     api_url="https://[your-owner-name]-[your_space_name].hf.space",
#     api_key="admin.apikey",
#     extra_headers={"Authorization": f"Bearer {os.environ['HF_TOKEN']}"},
# )
Let’s add the imports we need:
[ ]:
from sentence_transformers import SentenceTransformer
from sentence_transformers.losses import CosineSimilarityLoss

from datasets import load_dataset

from setfit import get_templated_dataset
from setfit import SetFitModel, SetFitTrainer
Enable Telemetry#
We gain valuable insights from how you interact with our tutorials. To improve ourselves in offering you the most suitable content, using the following lines of code will help us understand that this tutorial is serving you effectively. Though this is entirely anonymous, you can choose to skip this step if you prefer. For more info, please check out the Telemetry page.
[ ]:
try:
    from argilla.utils.telemetry import tutorial_running
    tutorial_running()
except ImportError:
    print("Telemetry is introduced in Argilla 1.20.0 and not found in the current installation. Skipping telemetry.")
💾 Embedding your dataset#
The code below will load the banking customer requests dataset from the Hub, encode the text field, and create the vectors field which will contain only one key (mini-lm-sentence-transformers). For the purposes of labeling the dataset from scratch, it will also remove the label field, which contains the original intent labels.
[ ]:
# Define fast version of sentence transformers, change to cuda if available
encoder = SentenceTransformer("all-MiniLM-L6-v2", device="cuda")

# Load dataset with banking
dataset = load_dataset("banking77", split="test")

# Encode text field using batched computation
dataset = dataset.map(
    lambda batch: {"vectors": encoder.encode(batch["text"])},
    batch_size=32,
    batched=True
)

# Removes the original labels because you'll be labeling from scratch
dataset = dataset.remove_columns("label")

# Turn vectors into a dictionary
dataset = dataset.map(
    lambda r: {"vectors": {"mini-lm-sentence-transformers": r["vectors"]}}
)
Our dataset now contains a vectors field with the embedding vector generated by the sentence transformer model.
[ ]:
dataset.to_pandas().head()
| text | vectors | |
|---|---|---|
| 0 | How do I locate my card? | {'mini-lm-sentence-transformers': [-0.01016701... |
| 1 | I still have not received my new card, I order... | {'mini-lm-sentence-transformers': [-0.04284121... |
| 2 | I ordered a card but it has not arrived. Help ... | {'mini-lm-sentence-transformers': [-0.03365556... |
| 3 | Is there a way to know when my card will arrive? | {'mini-lm-sentence-transformers': [0.012195922... |
| 4 | My card has not arrived yet. | {'mini-lm-sentence-transformers': [-0.04361867... |
🔫 Zero-shot predictions with SetFit#
The original banking77 dataset is an intent classification dataset with dozens of labels (lost_card, card_arrival, etc.). To keep this tutorial simple, we define a simplified labeling scheme with higher-level classes.
Let’s set up and train our zero-shot SetFit model. Please note that SetFit’s approach to zero-shot is to create a synthetic dataset of training examples, which is different from other approaches (e.g., transformers zero-shot pipelines) where “templated” examples with label names are used at inference time.
[ ]:
labels = ["change details", "card", "atm", "top up", "balance", "transfer", "exchange rate", "pin"]
train_dataset = get_templated_dataset(
    candidate_labels=labels,
    sample_size=8,
    template="The customer request is about {}"
)

model = SetFitModel.from_pretrained("all-MiniLM-L6-v2")
trainer = SetFitTrainer(
    model=model,
    train_dataset=train_dataset
)
trainer.train()
We can use our trained zero-shot model to predict over the dataset. We’ll later load these predictions into Argilla and use them to speed up the labeling process.
[ ]:
def get_predictions(texts):
    probas = model.predict_proba(texts, as_numpy=True)
    for pred in probas:
        yield [{"label": label, "score": score} for label, score in zip(labels, pred)]

dataset = dataset.map(lambda batch: {"prediction": list(get_predictions(batch["text"]))}, batched=True)
Let’s upload our dataset with vectors and predictions.
[ ]:
rg_ds = rg.DatasetForTextClassification.from_datasets(dataset)

rg.log(
    name="banking77-topics-setfit",
    records=rg_ds,
    chunk_size=50,
)
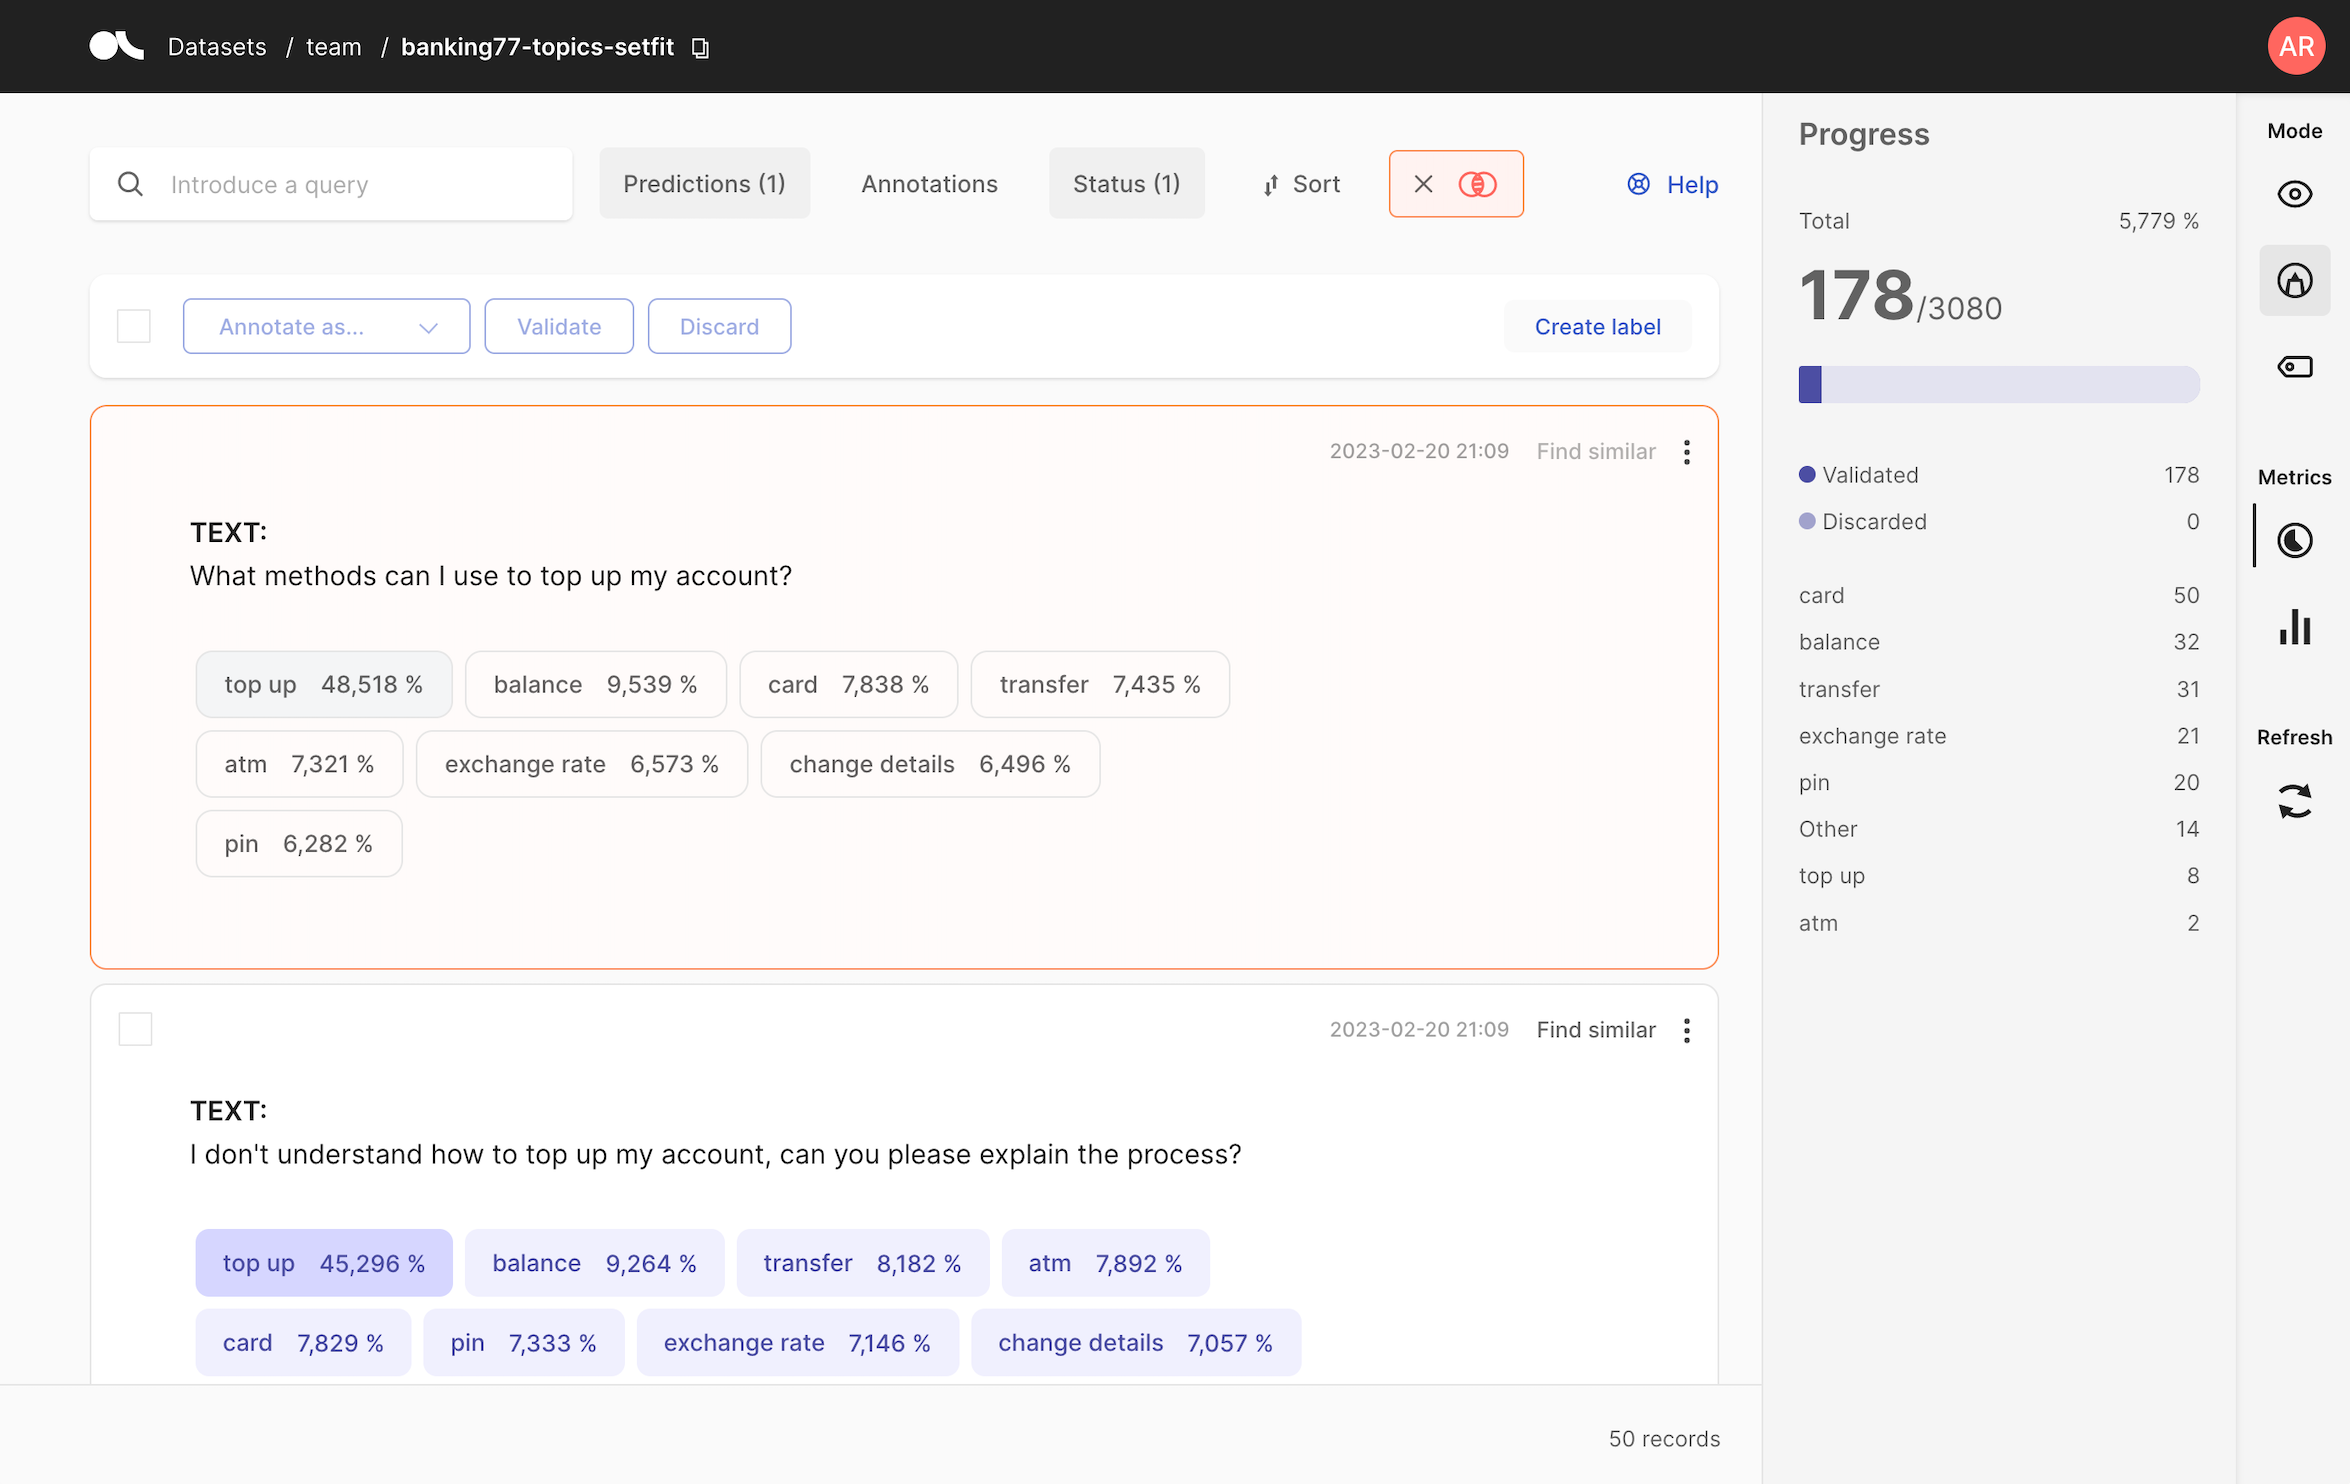
🏷 Bulk labeling with the find similar and zero-shot predictions#
Now that our banking77-topics-setfit is available from the Argilla UI. You can start annotating the data by leveraging similarity search and our zero-shot predictions. After going to your Argilla UI URL, the workflow is as follows:
Label a record (e.g., label “Change my information” as
change details) and then click on Find similar on the top-right of your record.As a result, you’ll get to a list of the most similar records sorted by similarity with their corresponding predictions.
You can now review the predictions, validate them, or correct them.
After labeling around 200 records, we’re ready to evaluate our zero-shot model, let’s see how!
📏 Evaluate the zero-shot model#
We can use Argilla’s built-in metrics to compute f1 based on (1) the predictions of the zero-shot model we stored at the beginning of the tutorial, and (2) the manual annotations. Please note that during the labeling process, we’ve added a new label Other to account for examples that didn’t fall into our predefined categories. This highlights the importance of iterating early on during project definition. Argilla gives users a lot of flexibility, features like predictions and similarity
search can help to surface potential issues and refinements much faster than with traditional data annotation tools.
[3]:
from argilla.metrics.text_classification import f1

f1(name="banking77-topics-setfit").visualize()
🦾 Train a few-shot SetFit model#
Even if the zero-shot approach gives decent results (~0.86 F1), we can use the labelled dataset to train a few-shot model to obtain ~0.95 accuracy.
[ ]:
# Load the hand-labelled dataset from Argilla
ds = rg.load("banking77-topics-setfit").prepare_for_training(train_size=0.8)

# Load SetFit model from Hub
# Feel free to experiment with other larger models, e.g. "sentence-transformers/paraphrase-mpnet-base-v2"
model = SetFitModel.from_pretrained("all-MiniLM-L6-v2")

# Create trainer
trainer = SetFitTrainer(
    model=model,
    train_dataset=ds["train"],
    eval_dataset=ds["test"],
    loss_class=CosineSimilarityLoss,
    batch_size=16,
    num_iterations=20,
)

# Train and evaluate
trainer.train()
metrics = trainer.evaluate()
print(metrics)
Summary#
In this tutorial, you learned to leverage embeddings and SetFit’s zero-shot predictions to build a training dataset. Afterwards, you learned how to train a SetFit model to improve the results of the zero-shot model.
If you are interested in SetFit, you can check our other SetFit with Argilla tutorials:
Or check out the SetFit repository on GitHub.