🗺️ Add bias-equality features to datasets with disaggregators#
In this tutorial, we will show you how you can use the disaggregators package to identify potential bias in your training data. We will walk you through this by using the following steps:
📰 Load news summary data
🗺️ apply disaggregator features
📊 analyze potential biases
Introduction#
“Addressing fairness and bias in machine learning models is more important than ever! One form of fairness is equal performance across different groups or features. To measure this, evaluation datasets must be disaggregated across the different groups of interest.” - HuggingFace.
In short, the disaggregators package, aims to answer the question: “What is in your dataset and how does this influence groups of interest?”.
For other bias and explainability measures take a look at our other tutorials on explainability.
Let’s get started!
Running Argilla#
For this tutorial, you will need to have an Argilla server running. There are two main options for deploying and running Argilla:
Deploy Argilla on Hugging Face Spaces: If you want to run tutorials with external notebooks (e.g., Google Colab) and you have an account on Hugging Face, you can deploy Argilla on Spaces with a few clicks:

For details about configuring your deployment, check the official Hugging Face Hub guide.
Launch Argilla using Argilla’s quickstart Docker image: This is the recommended option if you want Argilla running on your local machine. Note that this option will only let you run the tutorial locally and not with an external notebook service.
For more information on deployment options, please check the Deployment section of the documentation.
Tip
This tutorial is a Jupyter Notebook. There are two options to run it:
Use the Open in Colab button at the top of this page. This option allows you to run the notebook directly on Google Colab. Don’t forget to change the runtime type to GPU for faster model training and inference.
Download the .ipynb file by clicking on the View source link at the top of the page. This option allows you to download the notebook and run it on your local machine or on a Jupyter notebook tool of your choice.
Setup#
To complete this tutorial, you will need to install the Argilla client and a few third-party libraries using pip. You also need to download a pretrained model from spaCy:
[ ]:
%pip install argilla disaggregators -qqq
!python -m spacy download en_core_web_lg -qqq
Let’s import the Argilla module for reading and writing data:
[1]:
import argilla as rg
If you are running Argilla using the Docker quickstart image or Hugging Face Spaces, you need to init the Argilla client with the URL and API_KEY:
[ ]:
# Replace api_url with the url to your HF Spaces URL if using Spaces
# Replace api_key if you configured a custom API key
rg.init(
    api_url="http://localhost:6900",
    api_key="admin.apikey"
)
If you’re running a private Hugging Face Space, you will also need to set the HF_TOKEN as follows:
[ ]:
# # Set the HF_TOKEN environment variable
# import os
# os.environ['HF_TOKEN'] = "your-hf-token"

# # Replace api_url with the url to your HF Spaces URL
# # Replace api_key if you configured a custom API key
# rg.init(
#     api_url="https://[your-owner-name]-[your_space_name].hf.space",
#     api_key="admin.apikey",
#     extra_headers={"Authorization": f"Bearer {os.environ['HF_TOKEN']}"},
# )
Now let’s include the imports we need:
[ ]:
from datasets import load_dataset
from disaggregators import Disaggregator
import pandas as pd
Enable Telemetry#
We gain valuable insights from how you interact with our tutorials. To improve ourselves in offering you the most suitable content, using the following lines of code will help us understand that this tutorial is serving you effectively. Though this is entirely anonymous, you can choose to skip this step if you prefer. For more info, please check out the Telemetry page.
[ ]:
try:
    from argilla.utils.telemetry import tutorial_running
    tutorial_running()
except ImportError:
    print("Telemetry is introduced in Argilla 1.20.0 and not found in the current installation. Skipping telemetry.")
📰 Load news summary data#
For this analysis, we will be using our news summary dataset from the HuggingFace hub. This dataset is focused on a text2text summarization task, which requires news texts to be summarized into a single sentence or title. Due to the nice integration with the HuggingFace hub, we can easily do this within several lines of code.
[ ]:
# load from datasets
my_dataset = load_dataset("argilla/news-summary")
dataset_rg = rg.read_datasets(my_dataset["train"], task="Text2Text")

# log subset into argilla
rg.log(dataset_rg[:1000], "news-summary", chunk_size=50) # set smaller chunk size to overcome io-issues
🗺️ Apply disaggregator features#
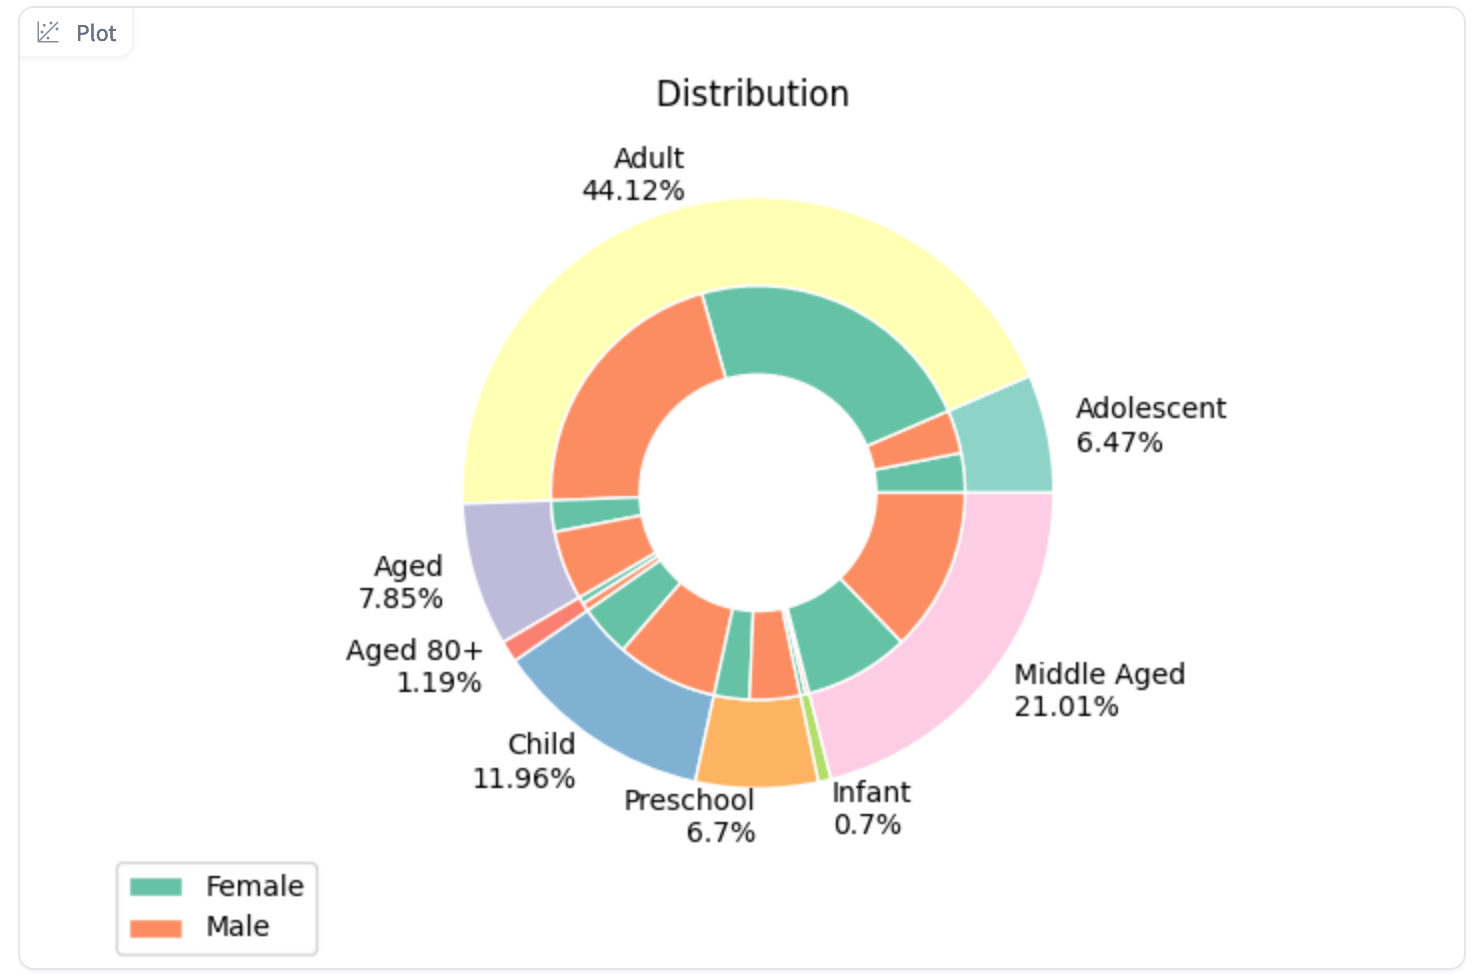
After having uploaded the data, we can now take a closer look at the potential disaggregators that the disaggregators package provides. It focuses on 5 main classes, with several sub-classes that can be assigned to the text, based on word matches. This means that each text can also be assigned to multiple classes.
“age”: [“child”, “youth”, “adult”, “senior”]
“gender”: [“male”, “female”]
“pronoun”: [“she_her”, “he_him”, “they_them”]
“religion”: [“judaism”, “islam”, “buddhism”, “christianity”]
“continent”: [“africa”, “americas”, “asia”, “europe”, “oceania”]
Even though we could choose to apply all categories, we can we will now only work with age and gender to simplify the anlysis.
[18]:
disaggregator_classes = ["age", "gender"]
ds = rg.load("news-summary")
df = pd.DataFrame({"text": [rec.text for rec in ds]})
disaggregator = Disaggregator(disaggregator_classes, column="text")
new_cols = df.apply(disaggregator, axis=1)
df = pd.merge(df, pd.json_normalize(new_cols), left_index=True, right_index=True)
df.head(5)
[18]:
| text | age.child | age.youth | age.adult | age.senior | gender.male | gender.female | |
|---|---|---|---|---|---|---|---|
| 0 | MEXICO CITY (Reuters) - Mexico central bank go... | True | True | False | False | True | False |
| 1 | WASHINGTON (Reuters) - The Trump administratio... | True | False | False | True | True | False |
| 2 | DUBAI (Reuters) - Iran has provided the capabi... | False | False | False | False | False | False |
| 3 | PALM BEACH, Fla. (Reuters) - U.S. President-el... | False | False | False | False | True | False |
| 4 | WASHINGTON (Reuters) - U.S. Senator Bill Nelso... | False | False | False | False | True | False |
Now, we have found and apprehended each of the potential disaggregators, we can assign them to the metadata variable for each one of our records and update the same record ids in the Argilla database.
[ ]:
metadata_ds = df[df.columns[1:]].to_dict(orient="records")
for metadata_rec, rec in zip(metadata_ds, ds):
    rec.metadata = metadata_rec
rg.log(ds, "news-summary", chunk_size=50) # upsert records
📊 Analyze potential biases#
Within the UI, there are two direct ways in which we can analyze the assigned bias-info.
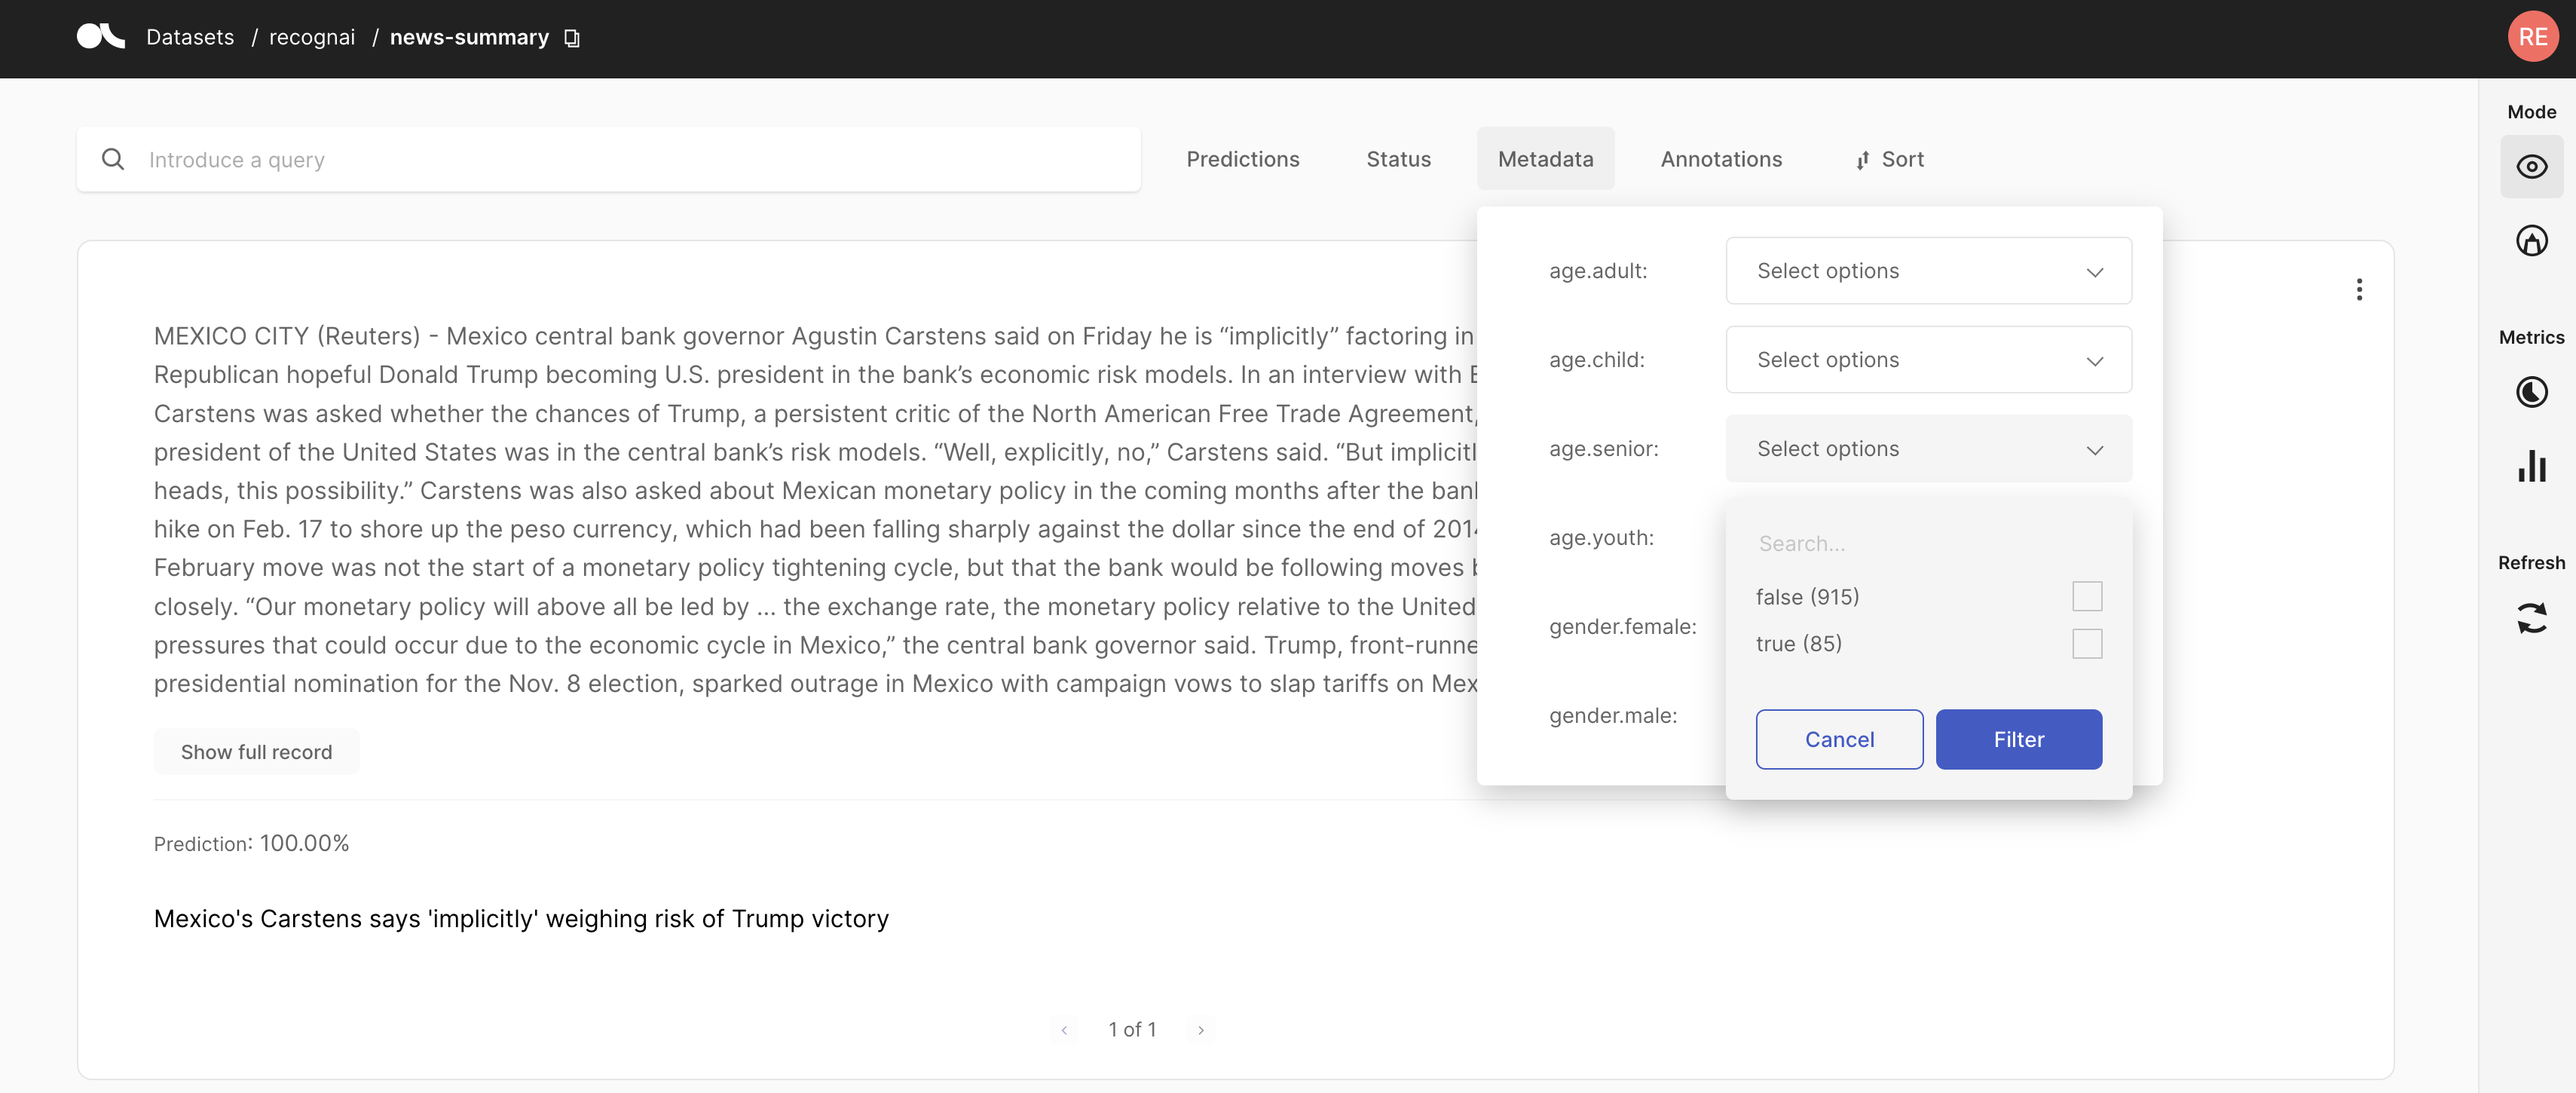
Filter based on metadata info#
By applying filters, we can choose to equally distribute the number of annotations over the potential causes for bias. By doing so, we ensure the eventual training data is also evenly distributed. Alternatively, we can also decide to only label data that has zero disaggregation, assuming they do not contain any of the considered biases.
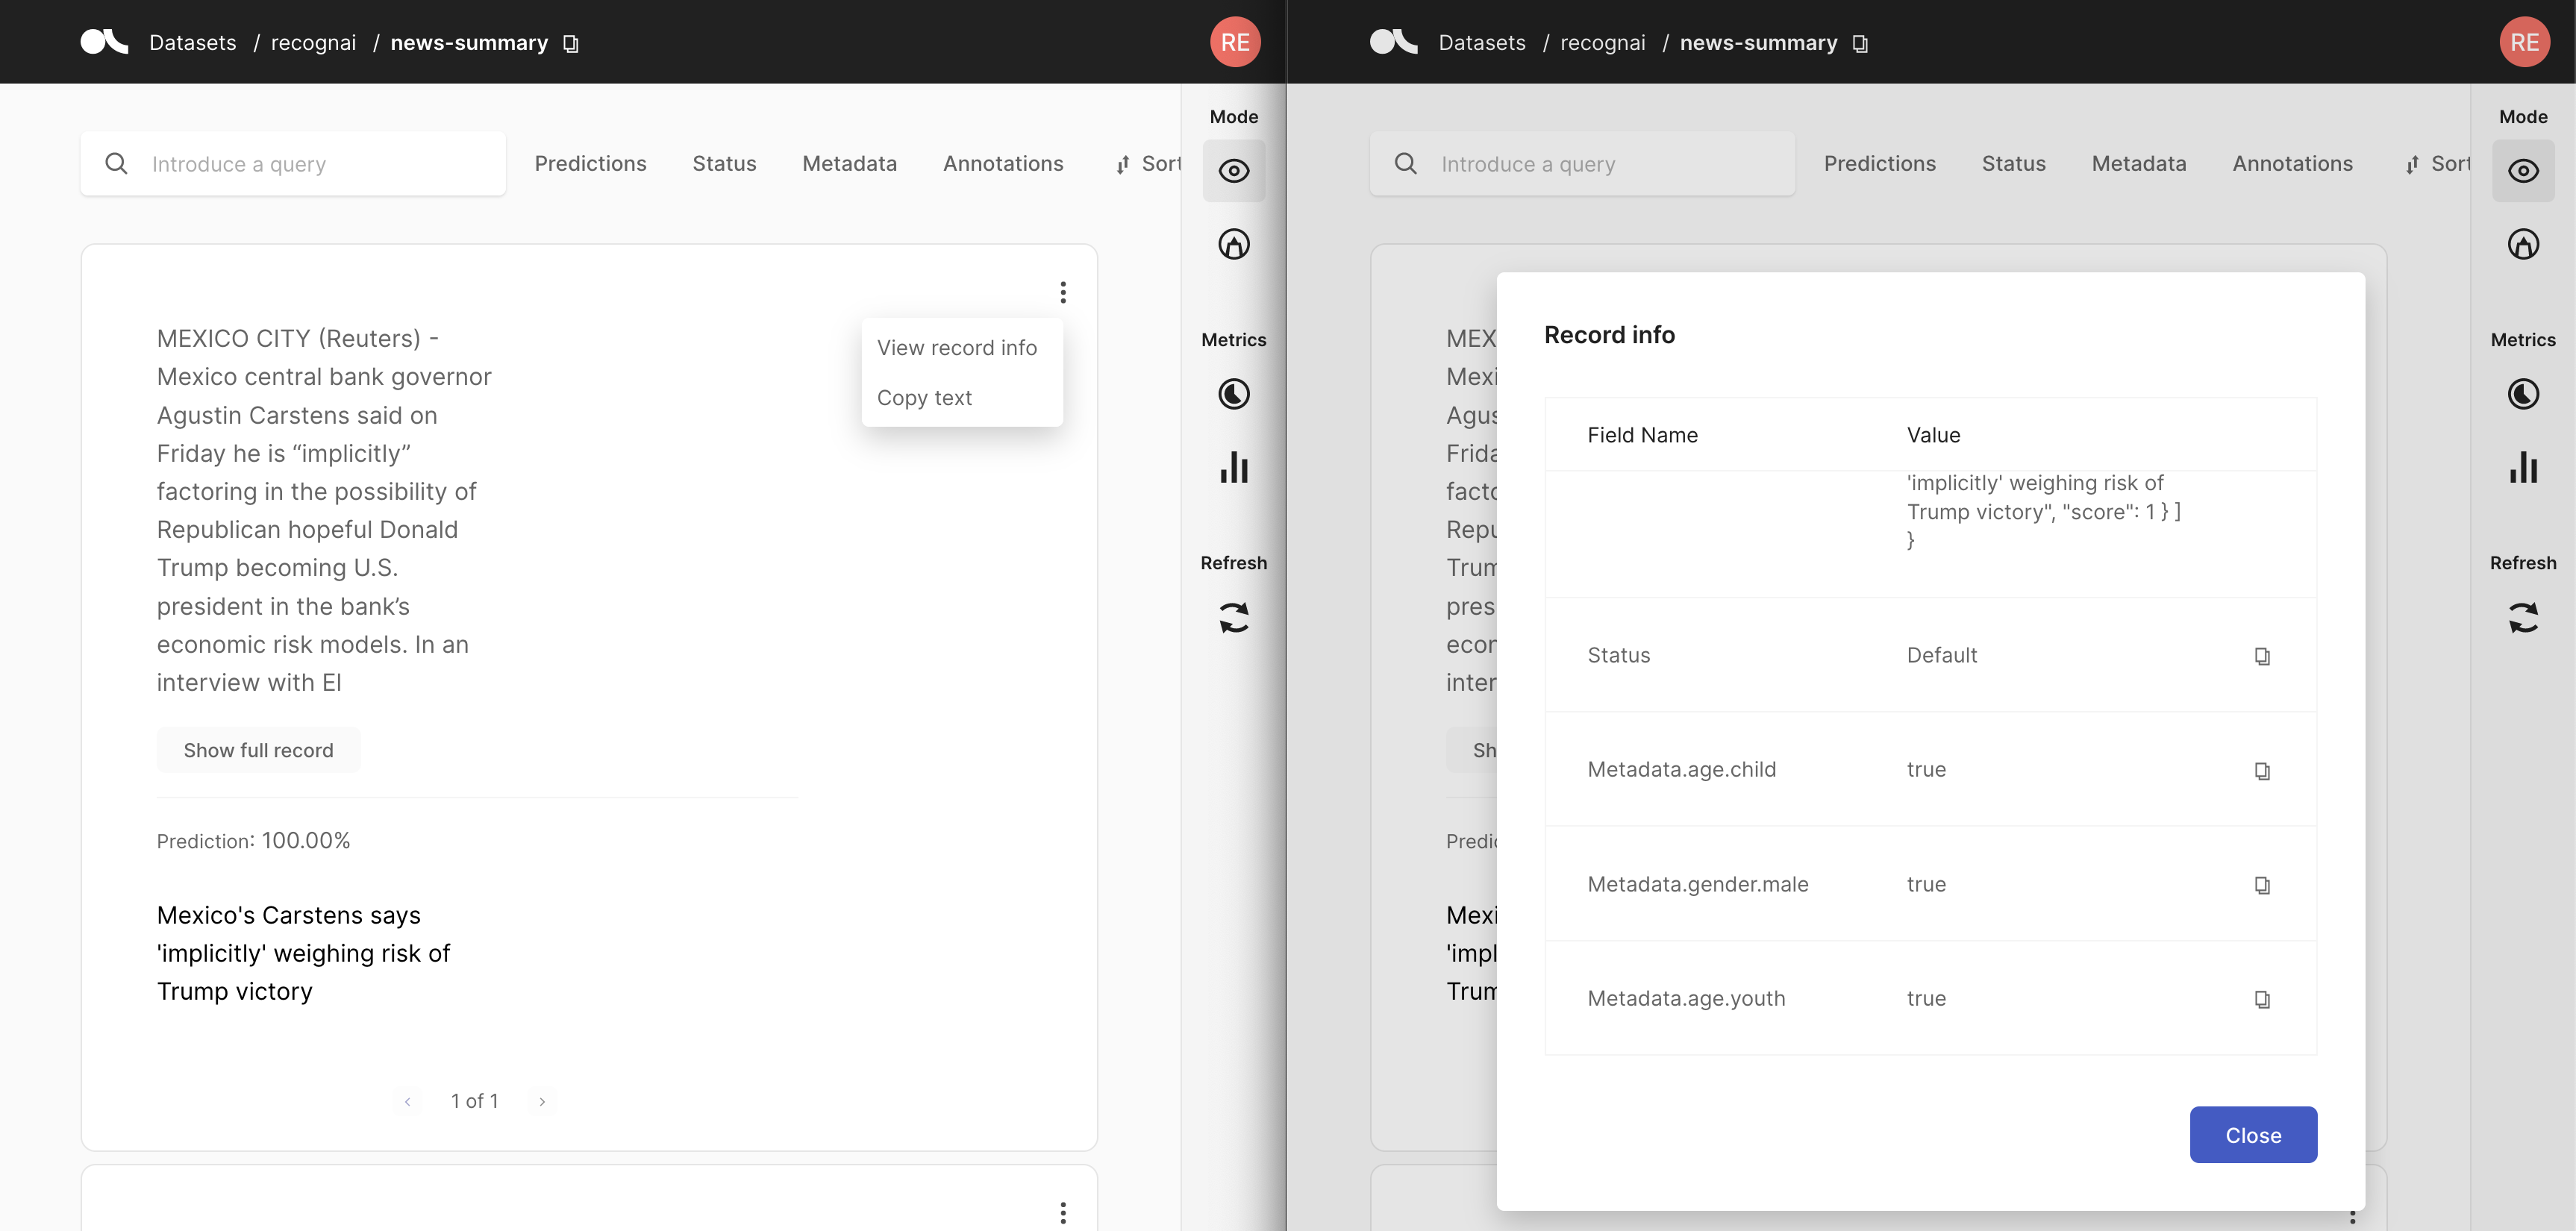
Inspect record info#
Even though inspecting the record info is a bit slower, we can potentially assume that it might provide context to record for annotators who might suspect bias within the data. This will allow them to take this into account during annotation.
Alternatives#
Besides the analyses mentioned above, there likely are way more interesting things you can do using this package. A good example is this HuggingFace space. So, be creative and avoid bias while doing so 😉
Summary#
In this tutorial, we learned about the disaggregators package, and how we can integrate this within Argilla. This can help data-scientists, ML-engineers and annotators to manage and mitigate bias in their datasets.