✍️ Annotate a dataset#
Feedback Dataset#
Note
The dataset class covered in this section is the FeedbackDataset. This fully configurable dataset will replace the DatasetForTextClassification, DatasetForTokenClassification, and DatasetForText2Text in Argilla 2.0. Not sure which dataset to use? Check out our section on choosing a dataset.
After pushing a FeedbackDataset to Argilla, as explained in Create a Dataset, you can start annotating it through the Argilla UI.
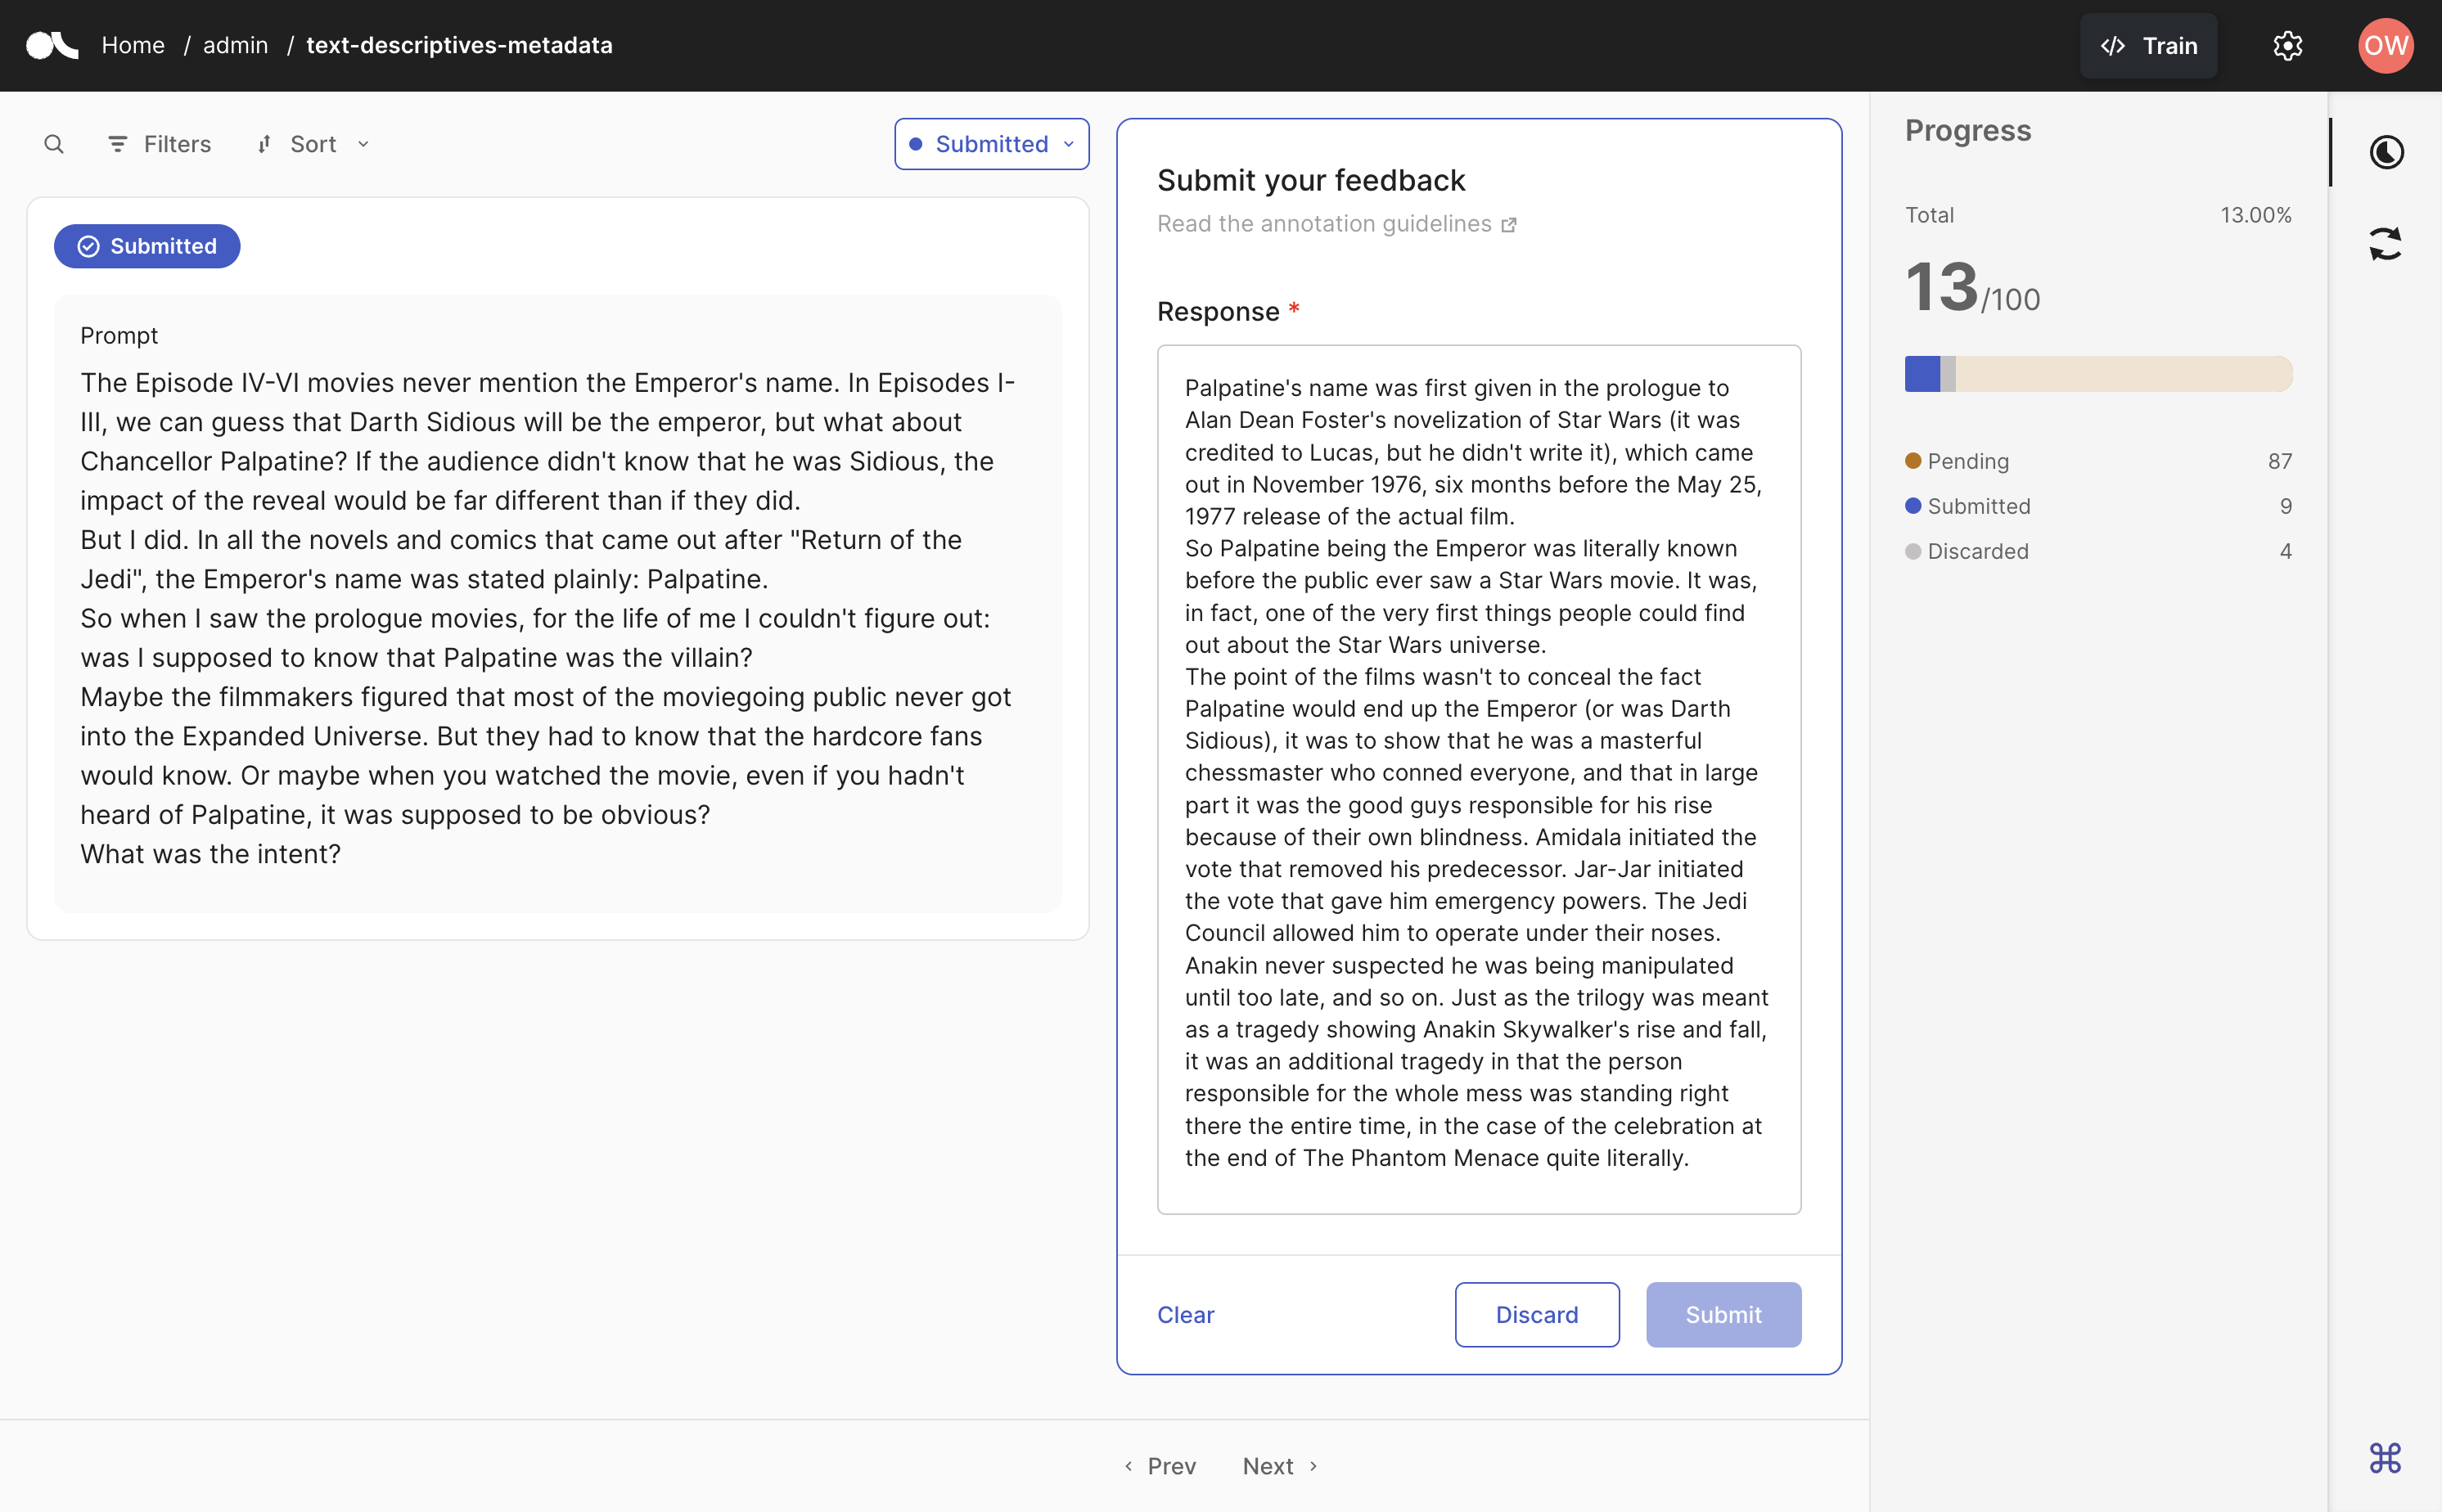
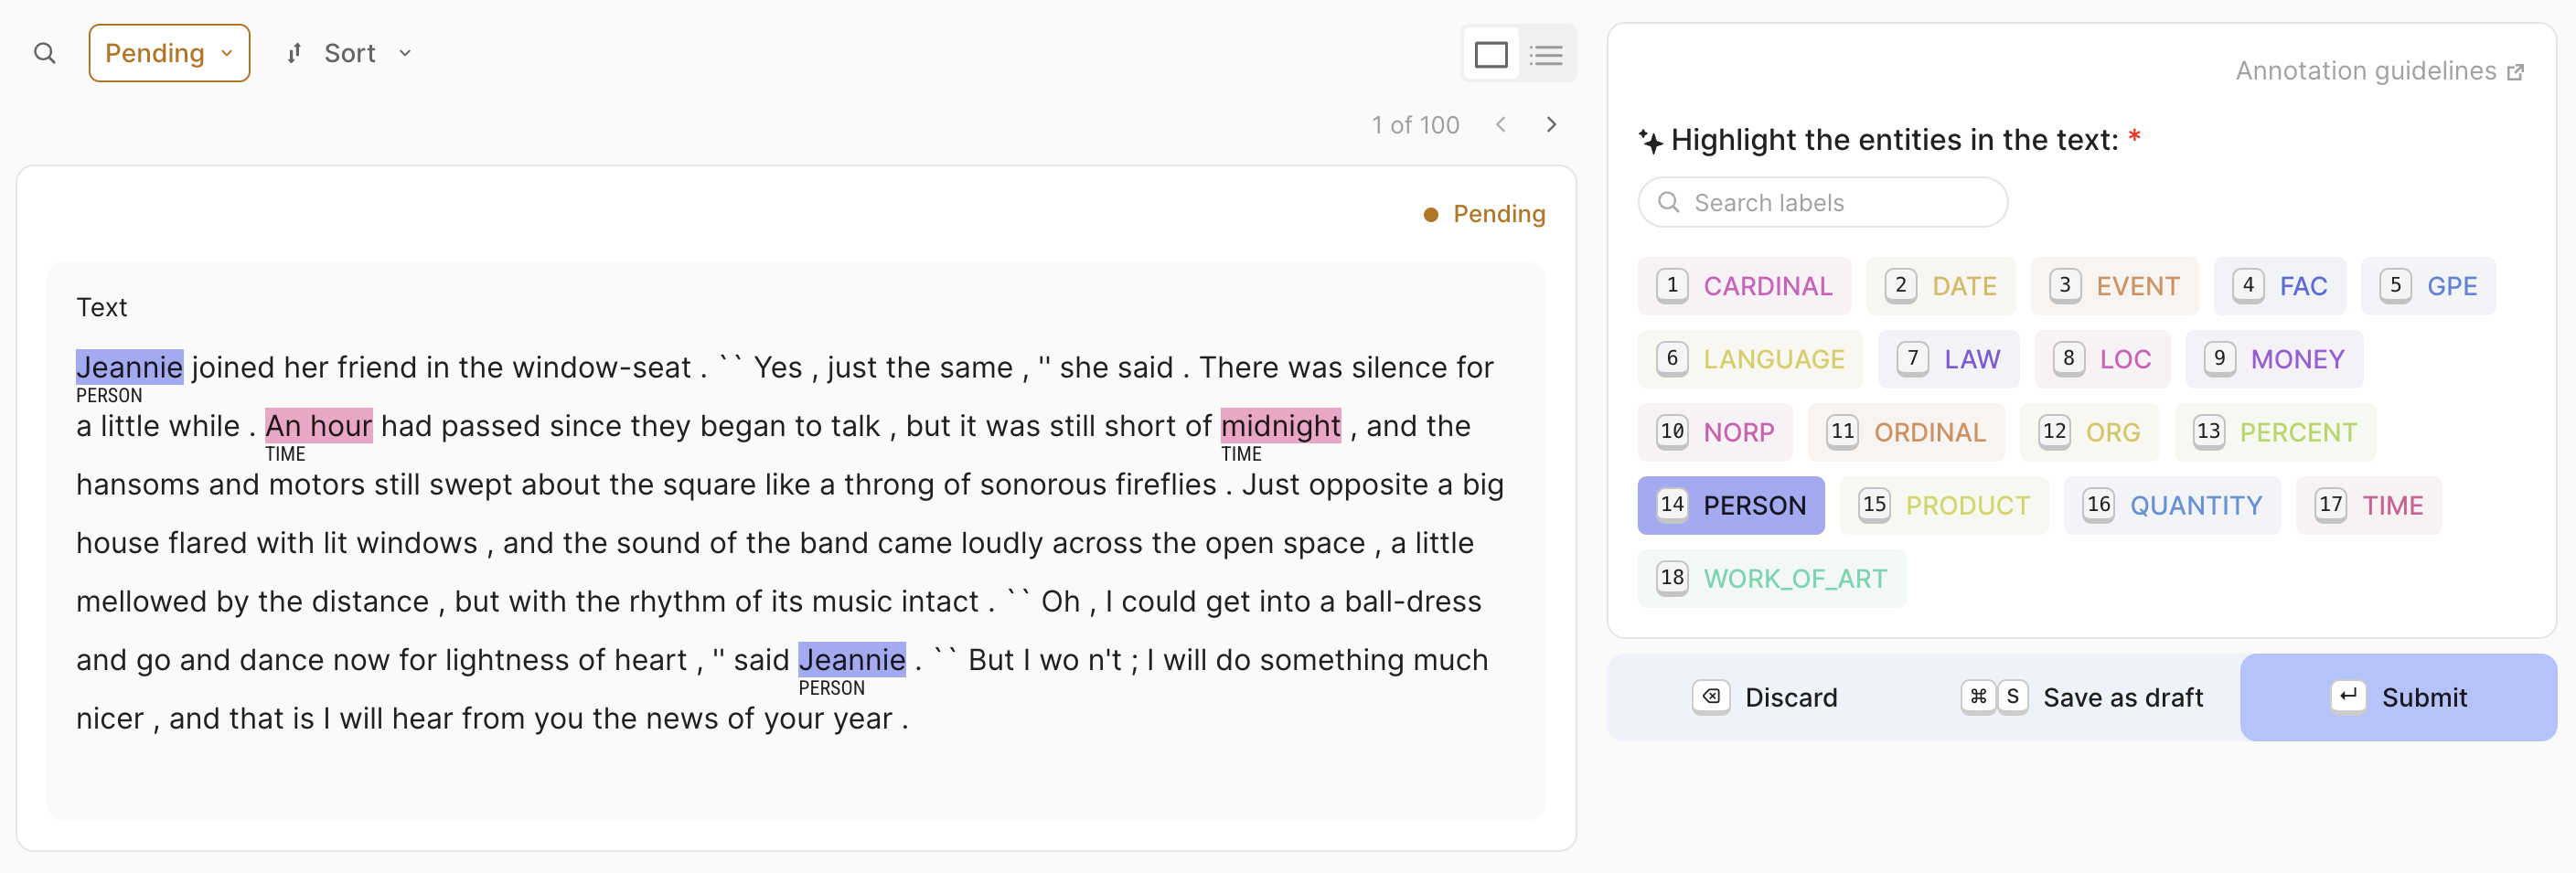
As you open the dataset in the UI, you will see by default the records with Pending responses, i.e. records that still don’t have a response (annotation), in a single-record view. On the left, you can find the record to annotate and to the right is the form with the questions to answer. You can navigate through the records using the Prev and Next buttons in the bottom bar. You may use the search bar and filters –as explained in the 🔎 Filter and query datasets page– to make the process faster and more efficient.
Hint
It is important that the dataset has annotations for a wide variety of records with diverse content. Try not to restrict your annotations to records retrieved in a single search or records with very similar content.
Note
If you are having issues with the search engine, you may need to reindex the dataset, as explained here.
We highly recommend that you read the annotation guidelines before starting the annotation, if there are any. If the guidelines have been specified, you can find them either on the dataset settings page or by clicking the “Read the annotation guidelines” button on the top right of the feedback panel, before starting the annotation.
In the annotation view, you will be able to provide responses/annotations to the given questions. Additionally, if a question has a description, you will find an info icon next to it. You can click it to see additional information about the question itself.
Here’s a description of the different types of questions you may find:
Select a single label from a collection of labels.

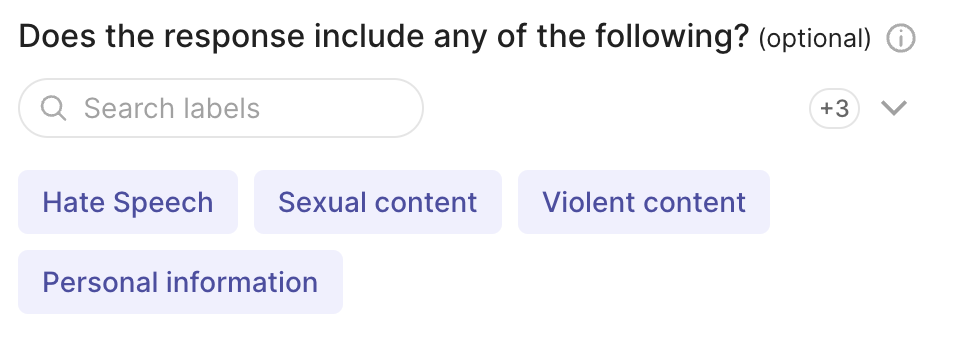
Select all applicable labels from a selection of labels.
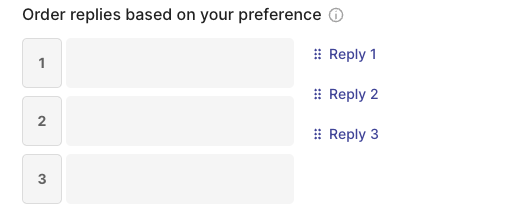
Order a collection of values. Note that you will need to order all the values to complete the response to this question, which means no value can be left unassigned. Ties are allowed.
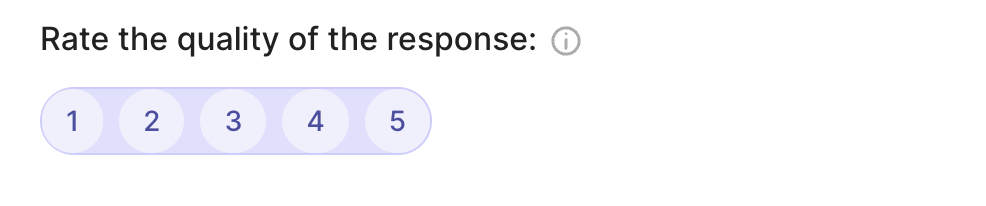
Select a single value from a list of values.
Select pieces of text in the field linked to the span question and apply a label.
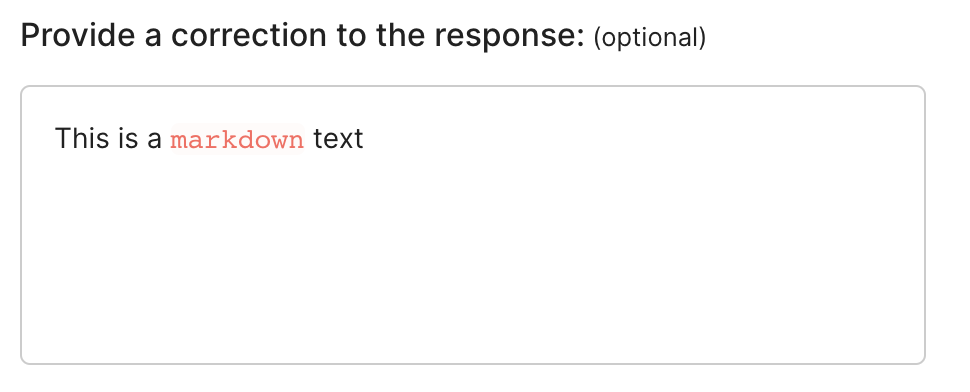
Provide a text response inside the text area.
Some questions may include a suggested response as well. Those questions will be marked with this icon ✨ and you will see the suggestion as a pre-filled response. If you agree with the suggestion, there is nothing you need to do; if you don’t make any modifications, the suggestion will be saved as your response once you submit the response. In case the suggestion is not quite right, you will just need to make the necessary modifications.
Additionally, you may find questions that are marked as required. Those questions will be marked with a red asterisk (*) and you will not be able to submit the response until you provide a response for those questions.
Once all required questions have responses, the Submit button will be enabled and you will be able to submit your response for the questions of the given record. In case you prefer to save a partial or complete response for review before submission, you can save it by clicking the Save as draft button. If you decide not to provide responses for a record, you can either move to the next record or discard it instead using the Discard button.
If you need to review your drafts, submitted or discarded responses, you can select the queue you need. From there, you can modify, save drafts, submit or discard responses.
You can track your progress and the number of Pending, Draft, Submitted and Discarded responses by clicking the Progress icon in the sidebar.
Shortcuts#
You can speed up your annotation by using these keyboard shortcuts:
Action |
Keys |
|---|---|
Activate form |
|
Move between questions |
|
Select and unselect label |
|
Move between labels or ranking options |
|
Select rating and rank |
|
Fit span to character selection |
Hold |
Activate text area |
|
Exit text area |
|
Discard |
|
Save draft (Mac os) |
|
Save draft (Other) |
|
Submit |
|
Move between pages |
|
Focus vs Bulk view#
In Argilla’s Feedback Task datasets, you can annotate and process records in two ways:
Focus view: you can only see, respond and perfom actions on one record at a time. This is better for records that need to be examined closely and individually before responding.
Bulk view: you can see multiple records in a list so you can respond and perform actions on more than one record at a time. This is useful for actions that can be taken on many records that have similar characteristics e.g., apply the same label to the results of a similarity search, discard all records in a specific language or save/submit records with a suggestion score over a safe threshold.
Hint
Use the Find Similar feature, other filters (Suggestions, Metadata, etc.) and sorting to get a list of records where it’s safe to do bulk actions and labelling. Learn more about how to use filters here.
Note
Span questions cannot be answered from the Bulk view. You will need to switch to Focus view to answer them.
If you have a Span question in your dataset, you can always answer other questions in bulk and save your responses as a draft. Later, you will be able to answer to the Span question in the Focus view of the Draft queue.
In the queue of Pending records, you can change from Focus to Bulk view. Once in the Bulk view, you can expand or collapse records –i.e. see the full length of all records in the page or set a fixed height– and select the number of records you want to see per page.
To select or unselect all records in the page, click on the checkbox above the record list. To select or unselect specific records, click on the checkbox inside the individual record card. When you use filters inside the bulk view and the results are higher than the records visible in the page but lower than 1000, you will also have the option to select all of the results after you click on the checkbox. You can cancel this selection clicking on the Cancel button.
Once records are selected, choose the responses that apply to all selected records (if any) and do the desired action: Discard, Save as draft or even Submit. Note that you can only submit the records if all required questions have been answered.
Other datasets#
Note
The records classes covered in this section correspond to three datasets: DatasetForTextClassification, DatasetForTokenClassification, and DatasetForText2Text. These will be deprecated in Argilla 2.0 and replaced by the fully configurable FeedbackDataset class. Not sure which dataset to use? Check out our section on choosing a dataset.
Annotate and validate predictions#
The Argilla UI provides a simple and intuitive interface for annotating records. Each task offers a variety of small features and interactions to optimize annotations, like model predictions that one can simply validate assuming they work reasonably well on your dataset.
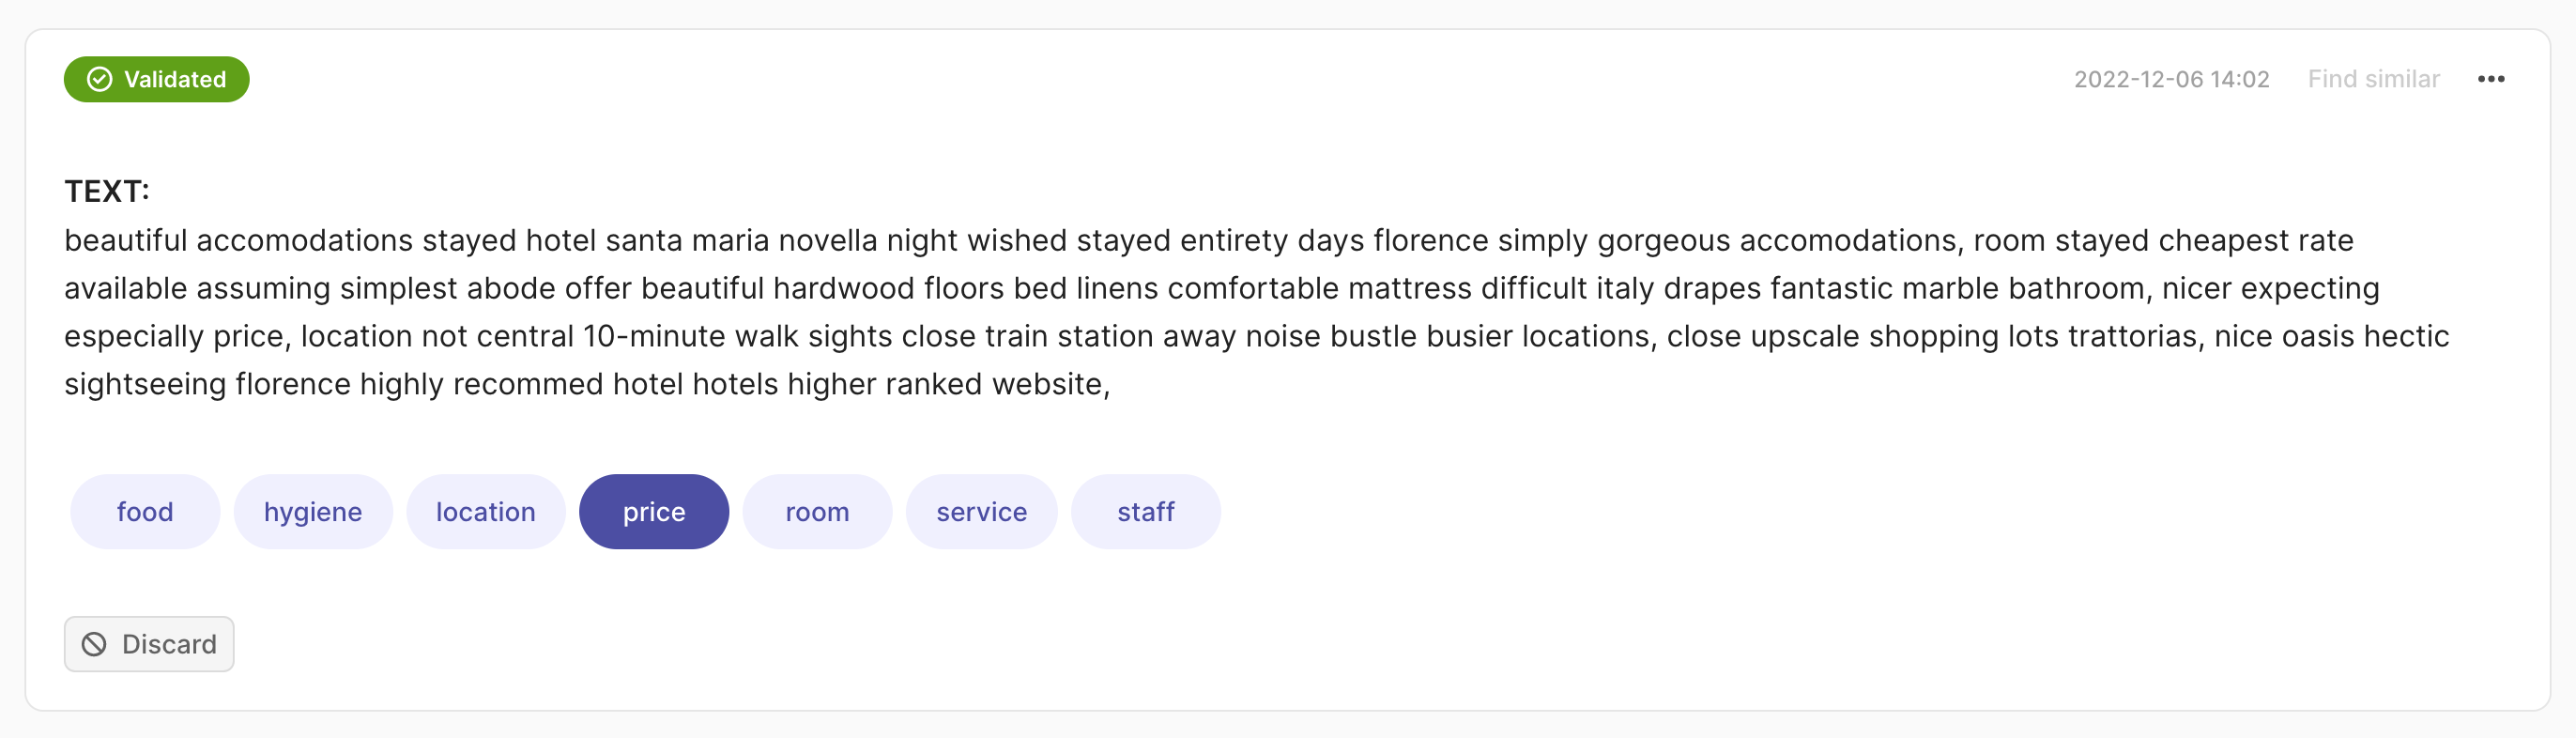
Text Classification#
For this task, you will only need to select the label(s) that describe the record best. Predictions are shown as percentages in the label tags and marked with a darker tone.
If the dataset is set up as a single label text classification, you can annotate the record by clicking on the desired label and the record will be validated automatically. If the record contains predictions, you may validate the record instead and the label with the highest score will be selected automatically. To remove the validated label, just click on it again.
To annotate a record in a multi-label text classification task, click on one or multiple labels. Once a label is selected, its status will show as Pending. Click Reset if you want to discard your changes and recover the previous state of the record or Validate to save your annotation into the dataset. The status will then change to Validated in the upper left corner of the record card.
If the multi-label record contains predictions and you would like to simply validate the predicted labels, click on Validate and all labels with a percentage above 50% will be automatically selected. You can also remove all annotations using the Clear button or discard a record from the dataset by clicking Discard.
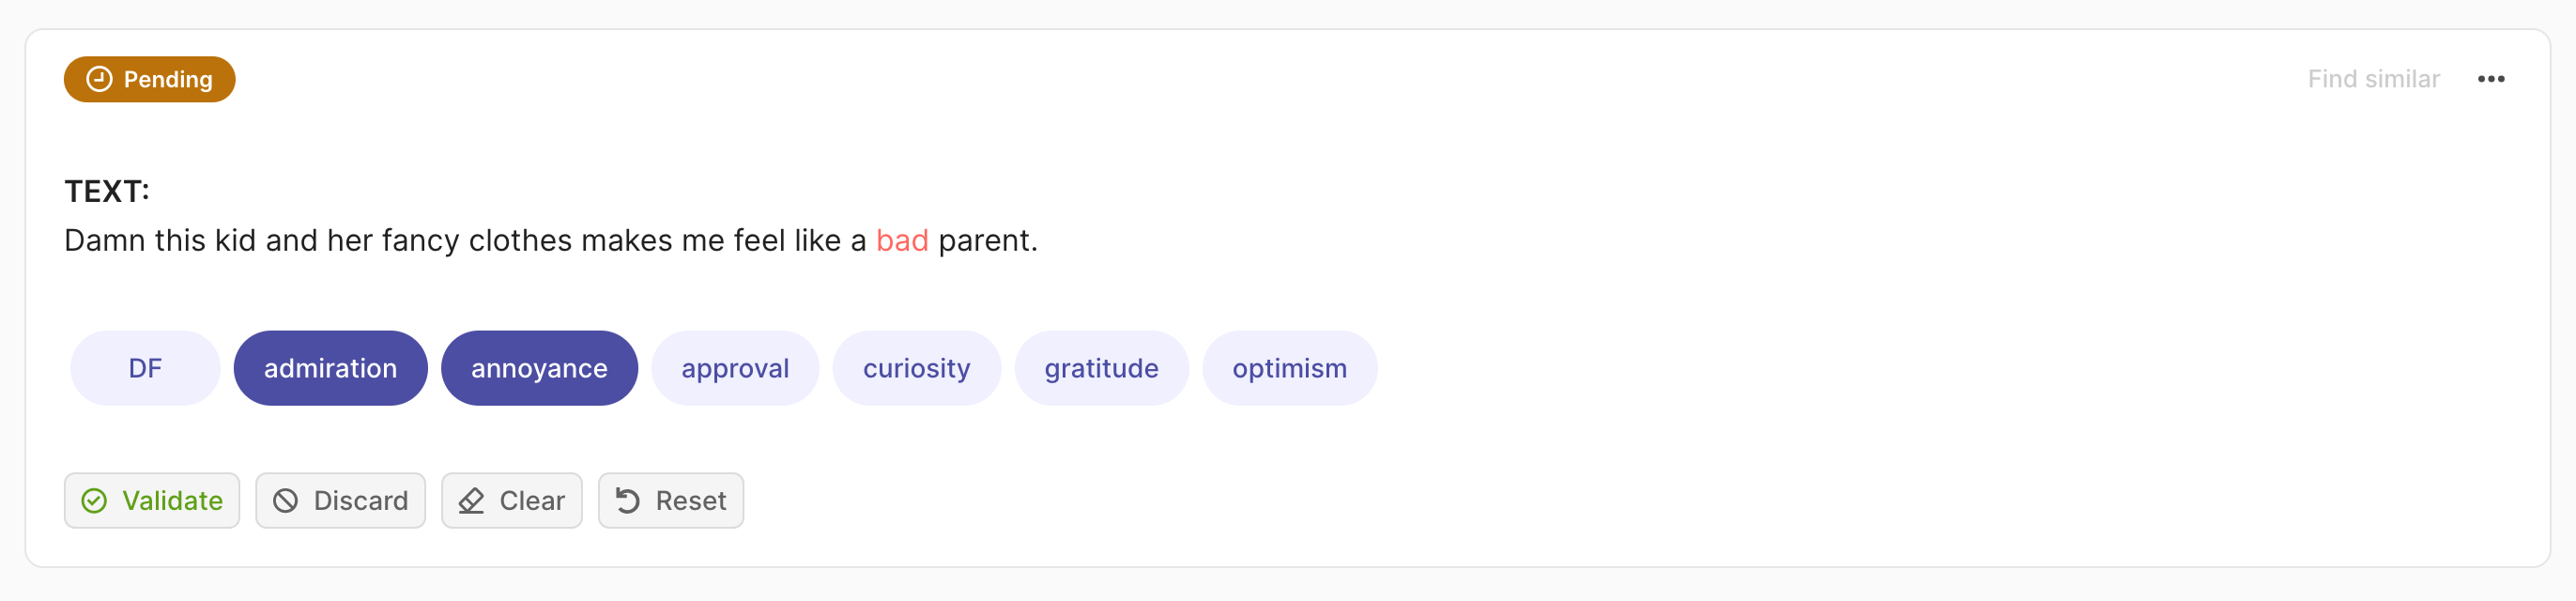
You can also remove all annotations using the Clear button or discard a record from the dataset by clicking Discard.
Note
When the dataset contains a large list of labels (10 +), we encourage viewing the record cards one by one (select 1 record per page from the footer) and using the arrow keys to move quickly between records.
Token Classification#
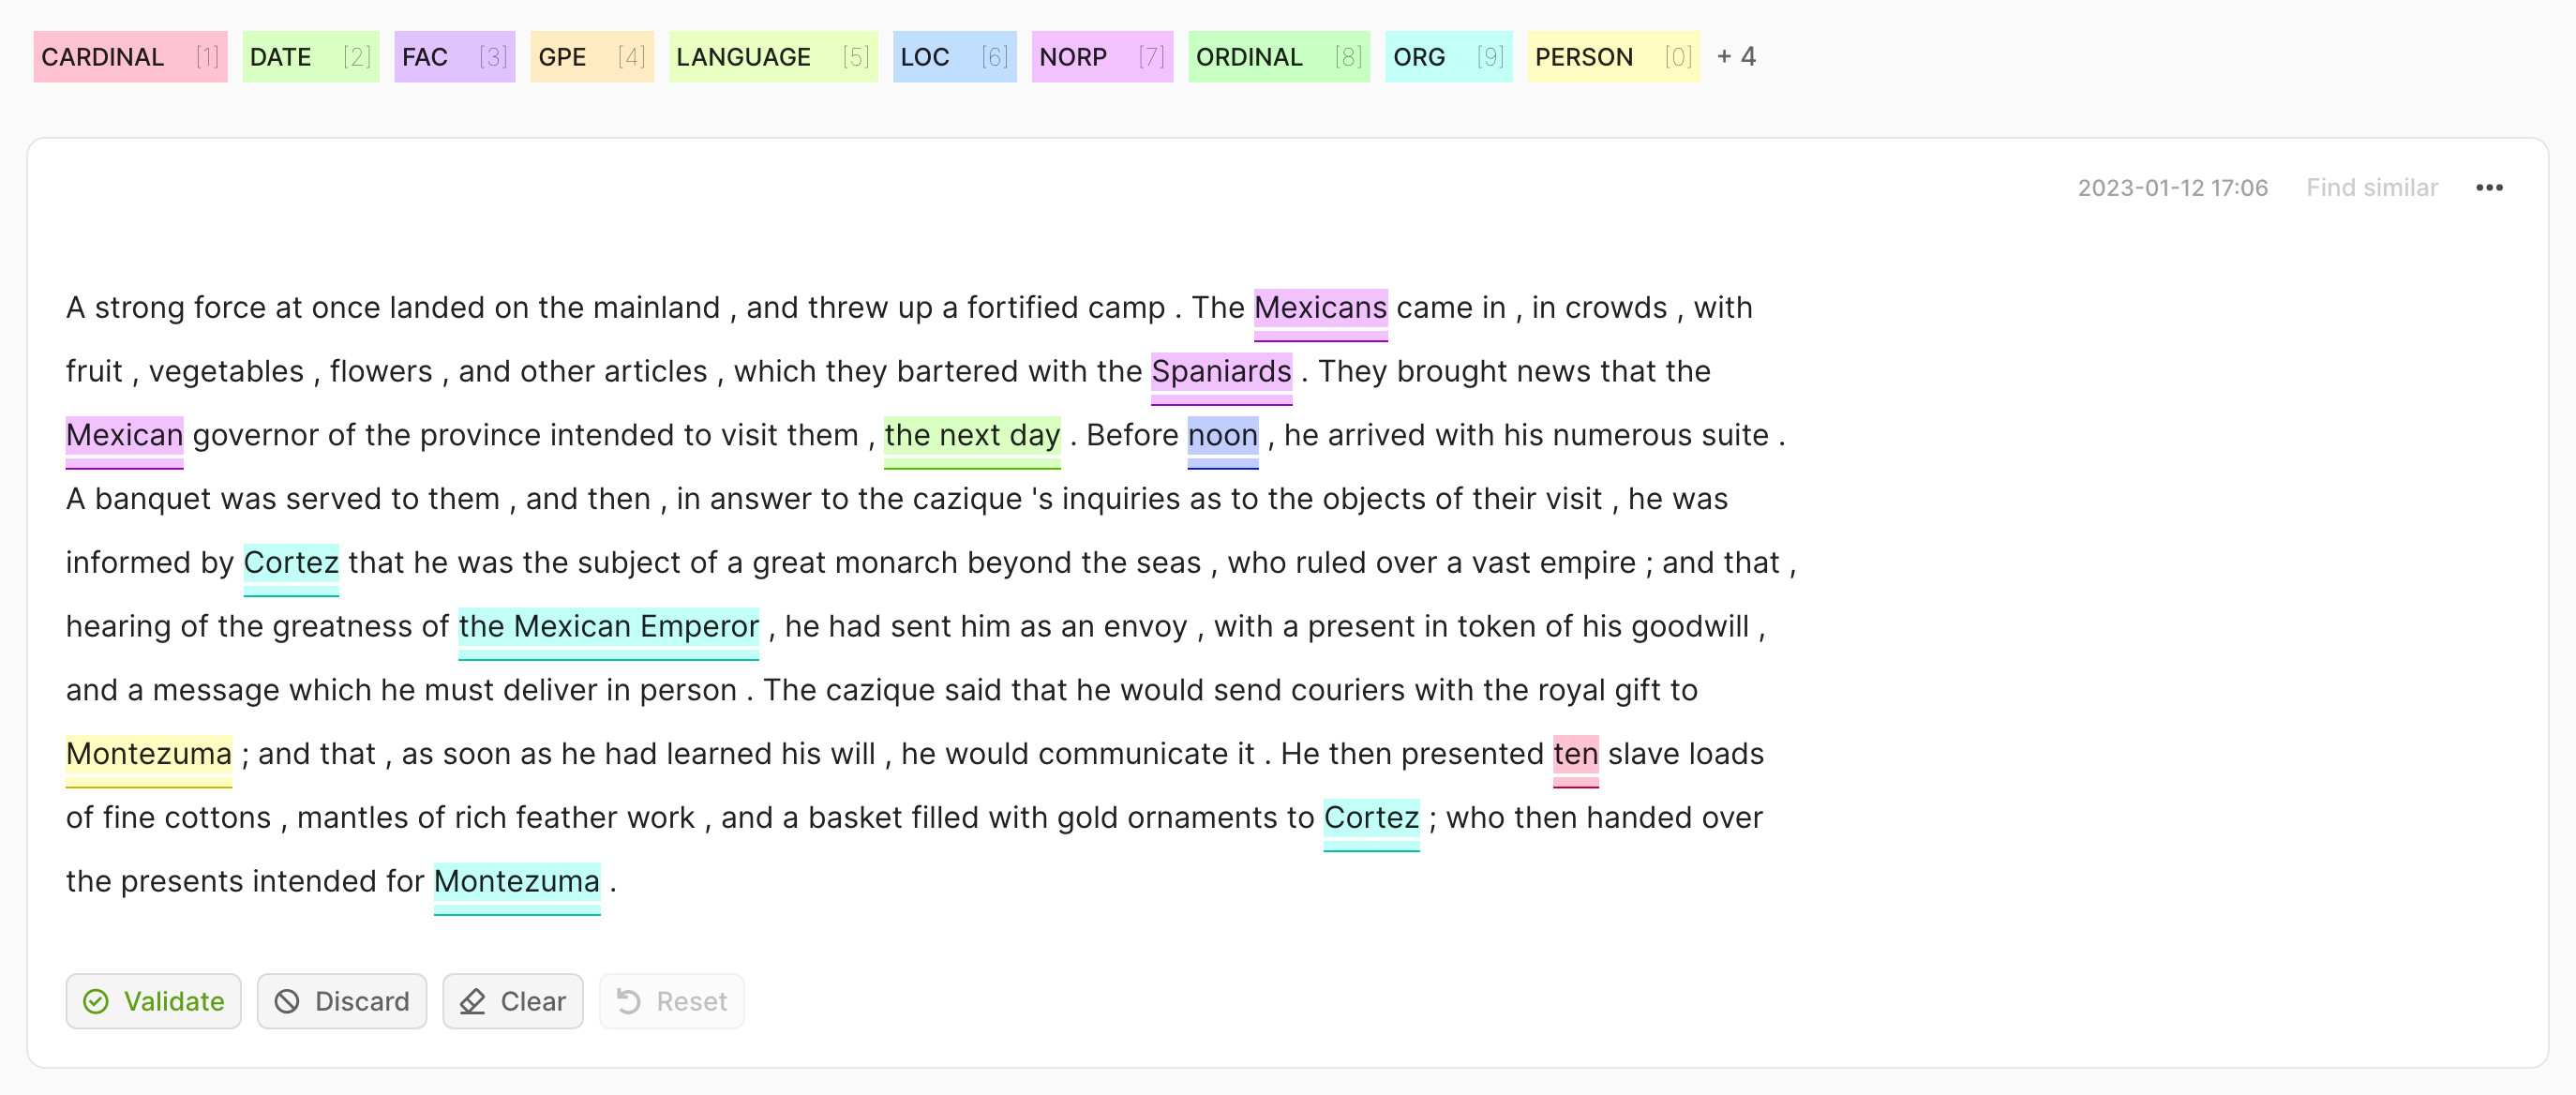
For token classification datasets, you can highlight words (tokens) in the text and annotate them with a label. Under the hood, the highlighting takes advantage of the tokens information in the Token Classification data model. For this task, predictions are shown as underlines. You can validate the predictions (or the absence of them) by pressing the Validate button.
To remove specific labels, hover over the highlights and press the X button or double-click directly on the colored area. You can also click the Clear button to remove all annotations in the record.
After modifying a record, either by adding or removing annotations, its status will change to Pending. When you have finished your annotation of the whole record, click Validate to save the changes. The status will change to Validated in the upper left corner of the record card. Alternatively, you can use the Reset button to discard your changes and recover the previous state of the record. If you want to discard the record from the dataset, click Discard.
Text2Text#
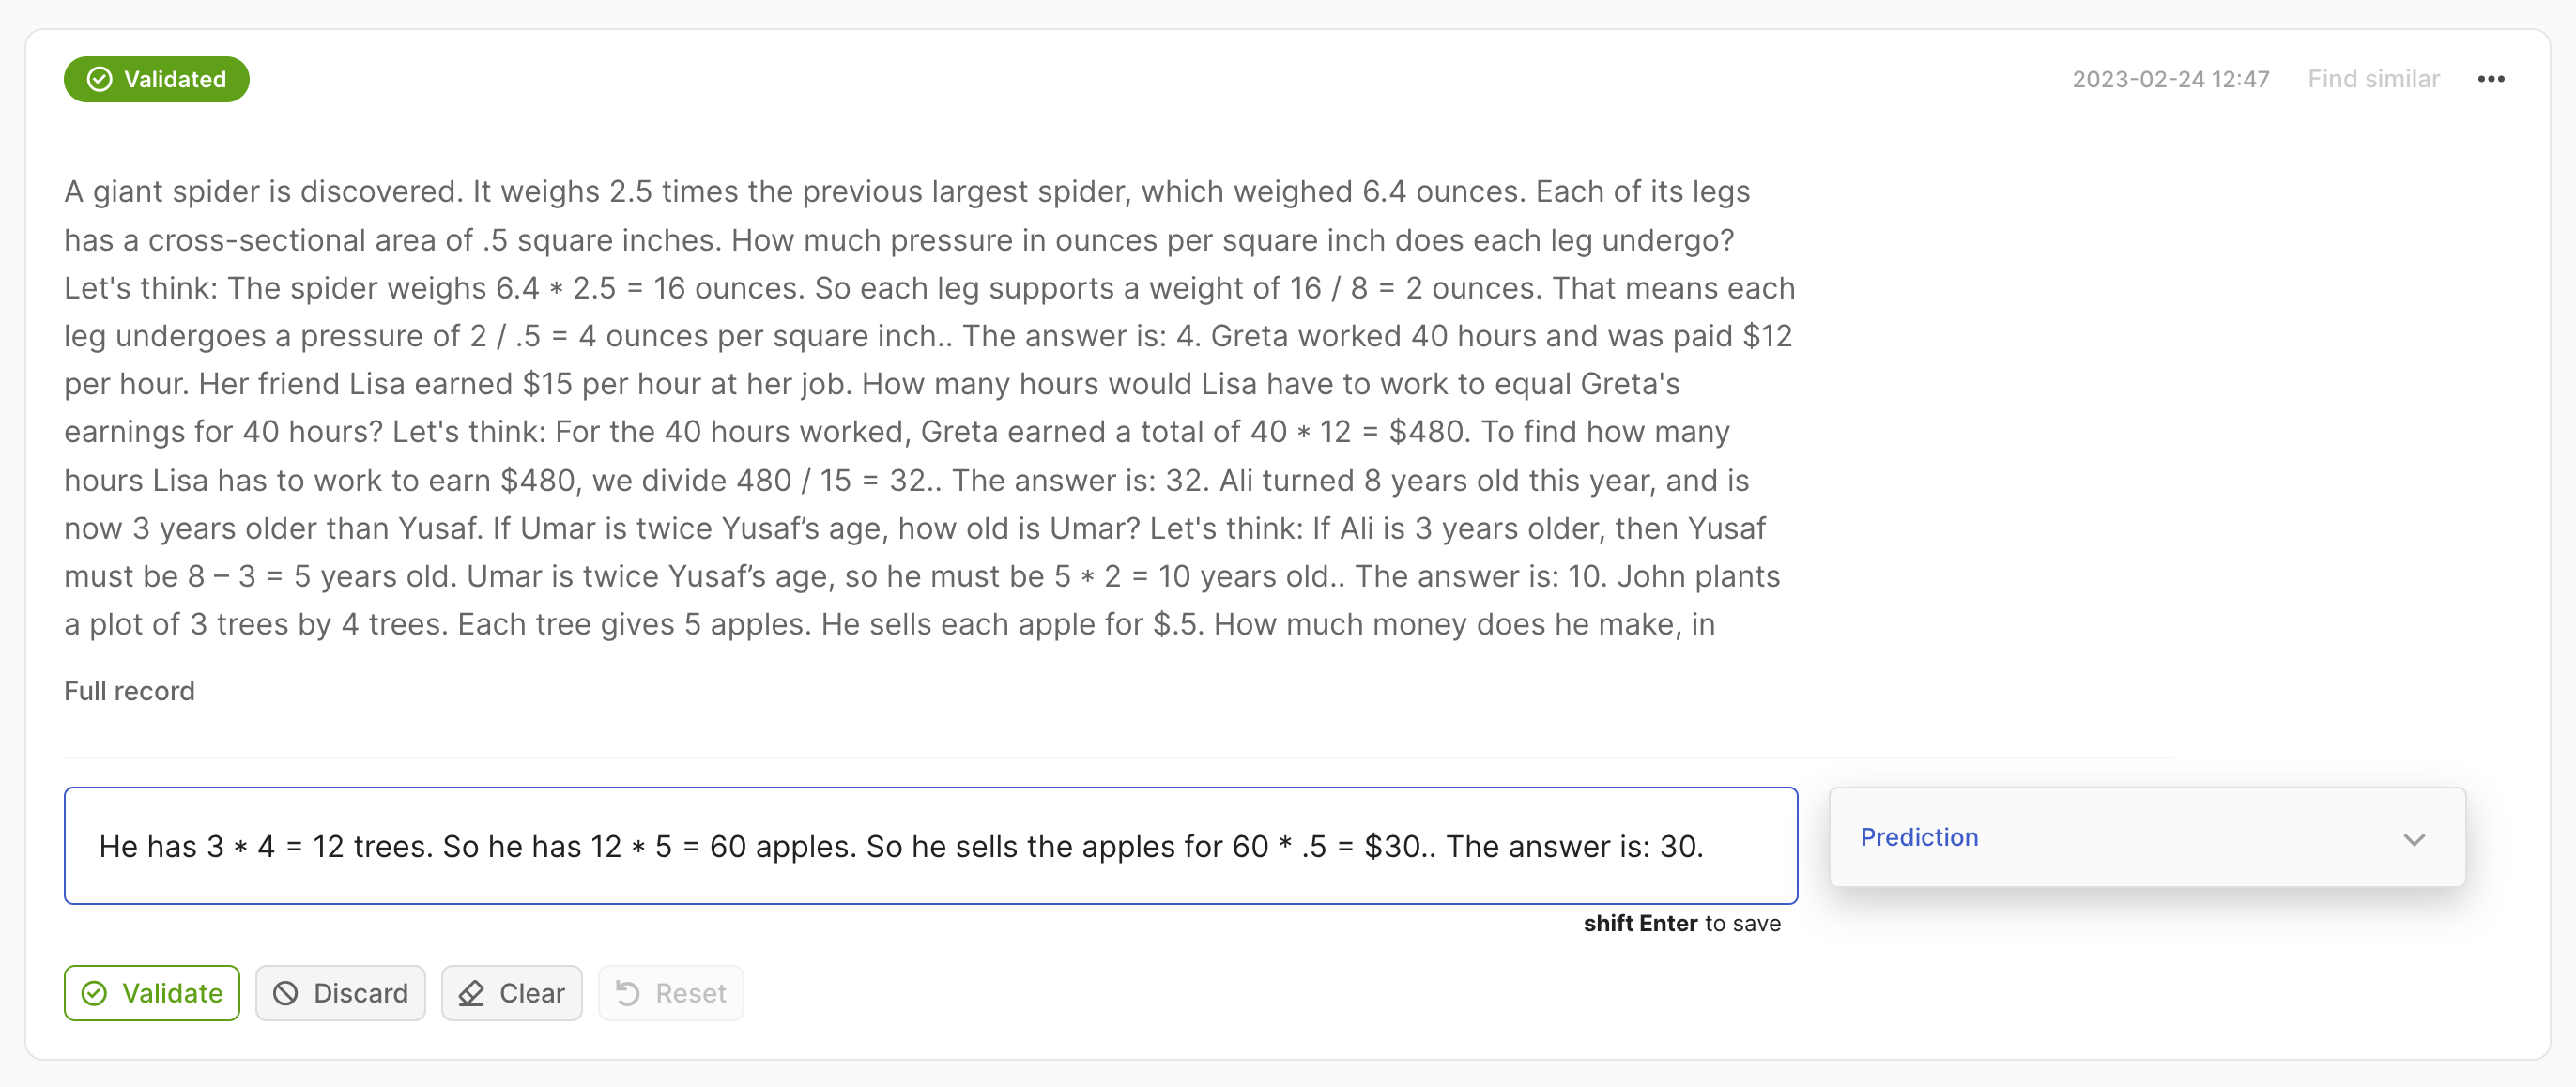 For Text2Text datasets, there is a text box available for drafting or editing annotations. If a record has one or more predictions, the prediction with the highest score will be pre-filled. You can validate the prediction by clicking on the Validate button or edit the text making the changes directly in the text box. If you make any changes, the status will change to Pending and you will need to press shift+Enter or click the Validate button to save the changes. After validating, predictions can still be accessed in the prediction panel on the right side of the record card.
Alternatively, you can discard your changes and revert to the previous state of the record using the Reset button or empty the text field by clicking the Clear button. If you want to discard the record from the dataset, click Discard.
Search and filter records#
Filters#
The Argilla UI provides a set of filters that help you to quickly and conveniently navigate your records. For example, you can filter records by their predictions, by specific metadata, or choose to only view records that are missing annotations. The filters are available in all modes of the UI.
Note
Not all filters listed below are available for all tasks.
Predictions filter#
This filter allows you to filter records with respect of their predictions:
Predicted as: filter records by their predicted labels.
Predicted ok: filter records whose predictions do, or do not, match the annotations.
Score: filter records with respect to the score of their prediction.
Predicted by: filter records by the prediction agent.
Annotations filter#
This filter allows you to filter records with respect to their annotations:
Annotated as: filter records with respect to their annotated labels.
Annotated by: filter records by the annotation agent.
Only records not covered by rules: this option only appears if you have defined weak labeling rules for your dataset. It allows you to show only records that are not covered by your rules.
Status filter#
This filter allows you to filter records with respect to their status:
Default: records without any annotation or edition.
Validated: records with validated annotations.
Edited: records with annotations but still not validated.
Metadata filter#
This filter allows you to filter records with respect to their metadata.
Hint
Nested metadata will be flattened and the keys will be joined by a dot.
Sort records#
With this component, you can sort the records by various parameters, such as the predictions, annotations or their metadata.
Search#
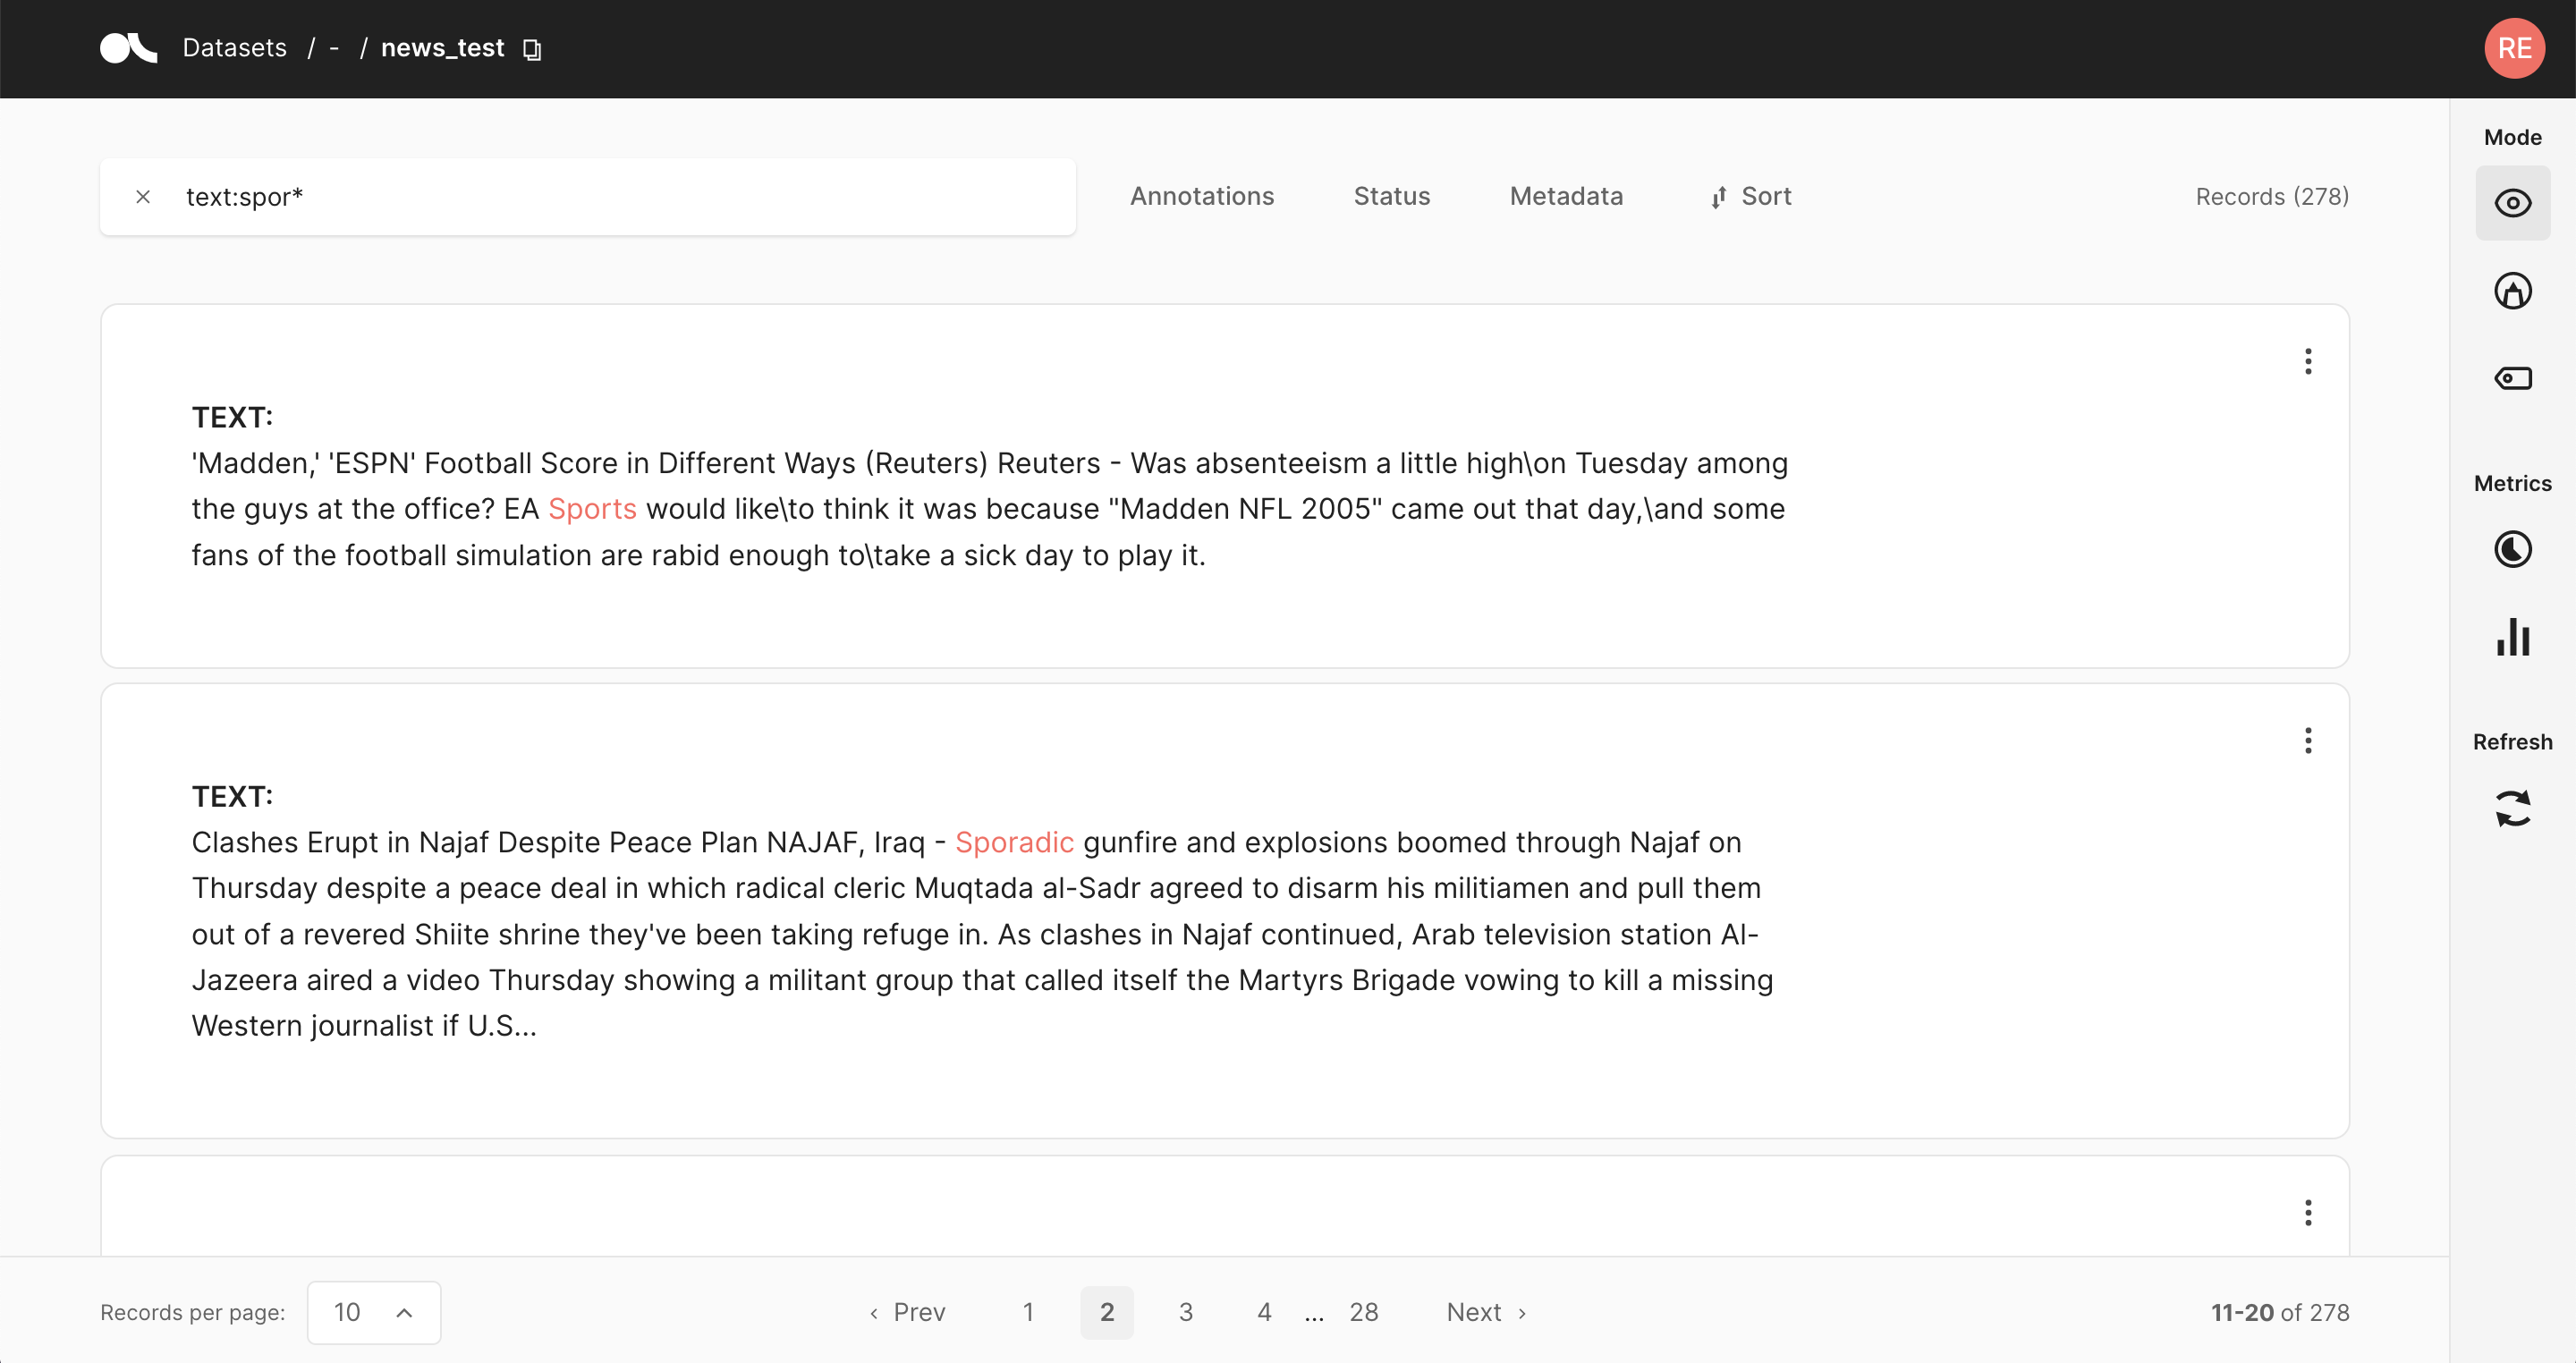
The search bar in Argilla is driven by Elasticsearch’s powerful query string syntax.
It allows you to perform simple fuzzy searches of words and phrases, or complex queries taking full advantage of Argilla’s data model.
Check out our guide for filtering and querying datasets for a comprehensive guide on how to search in the Argilla UI.
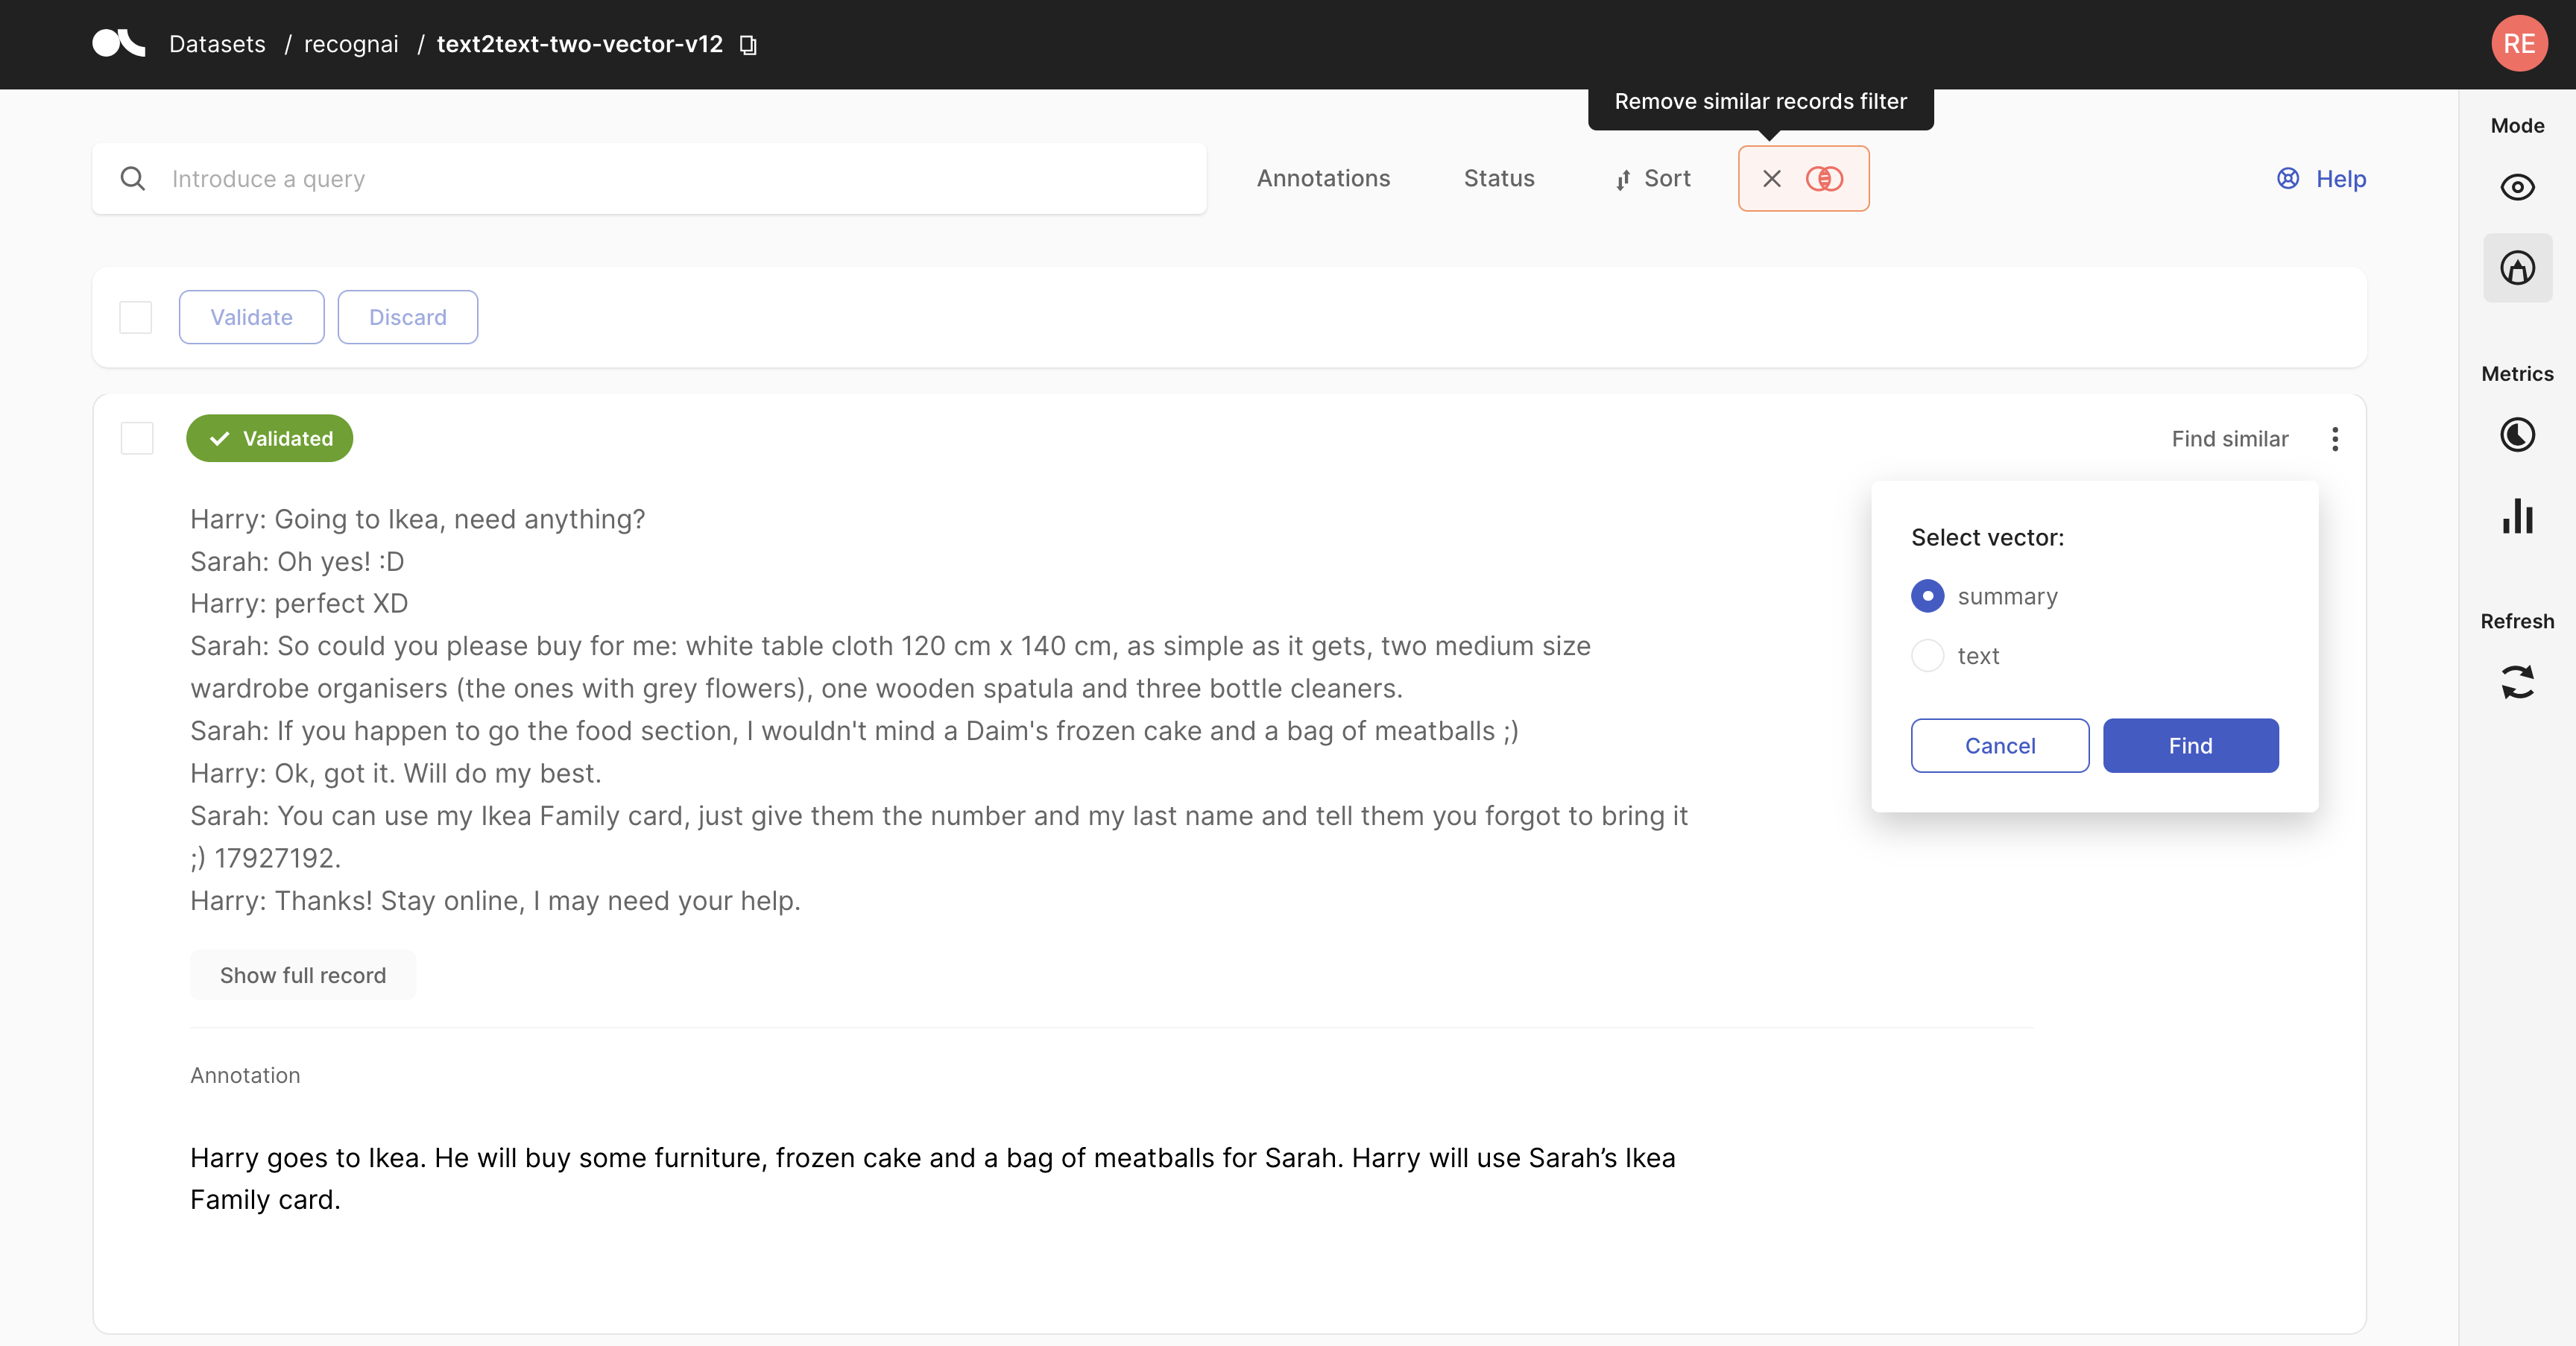
Semantic search#
This feature enables you to find similar records when exploring or annotating records. This leverages semantic search to find “semantically” similar records. In order to use this feature, your dataset records should contain vectors which can be associated when logging the dataset into Argilla.
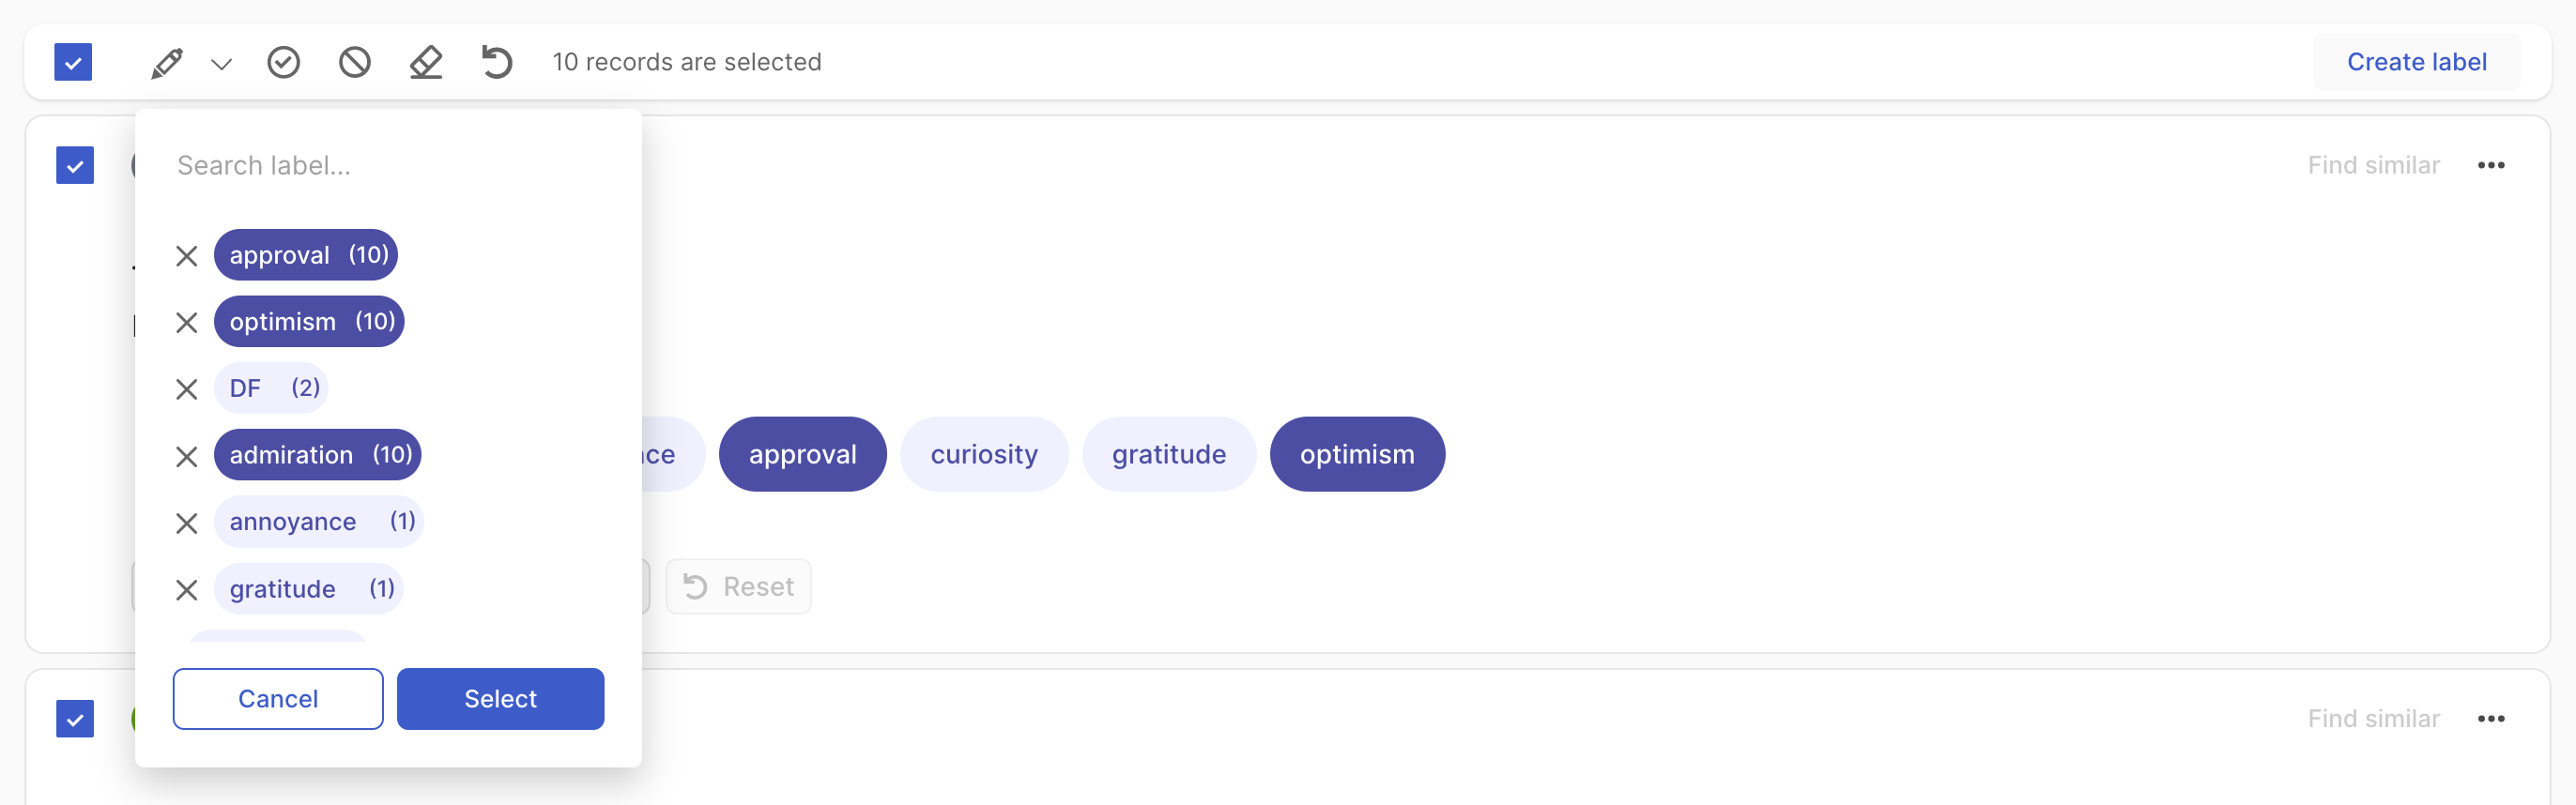
Bulk labeling and actions#
For all tasks, you can use bulk actions. You can either select the records one by one with the selection box on the upper left of each card, or you can use the global selection box below the search bar, which will select all records shown on the page. Then you can Validate and Discard the selected records using the icons next to the global selection box. For the multi-label text classification and token classification tasks you can also Clear and Reset at bulk level.

For the text classification task, you can additionally bulk annotate the selected records by simply clicking on the pencil icon next to the global selection box and selecting the label(s) from the list.
In multi-label text classification, you can remove labels from selected records by clicking the cross next to the label. You can also assign a partially used label to the whole selection by clicking on the tag button. Once you have made your selection, click Select to apply the annotations to all selected records. To finalize the validation, click on the “validate” icon.
In single-label text classification, there is no need to validate after selecting your label.
Weak labeling#
The Argilla UI has a dedicated mode to find good heuristic rules, also often referred to as labeling functions, for a weak supervision workflow. As shown in our guide and tutorial, these rules allow you to quickly annotate your data with noisy labels in a semiautomatic way.
You can access the Weak labeling mode via the sidebar of the Dataset page.
Note
The Weak labeling mode is only available for text classification datasets.
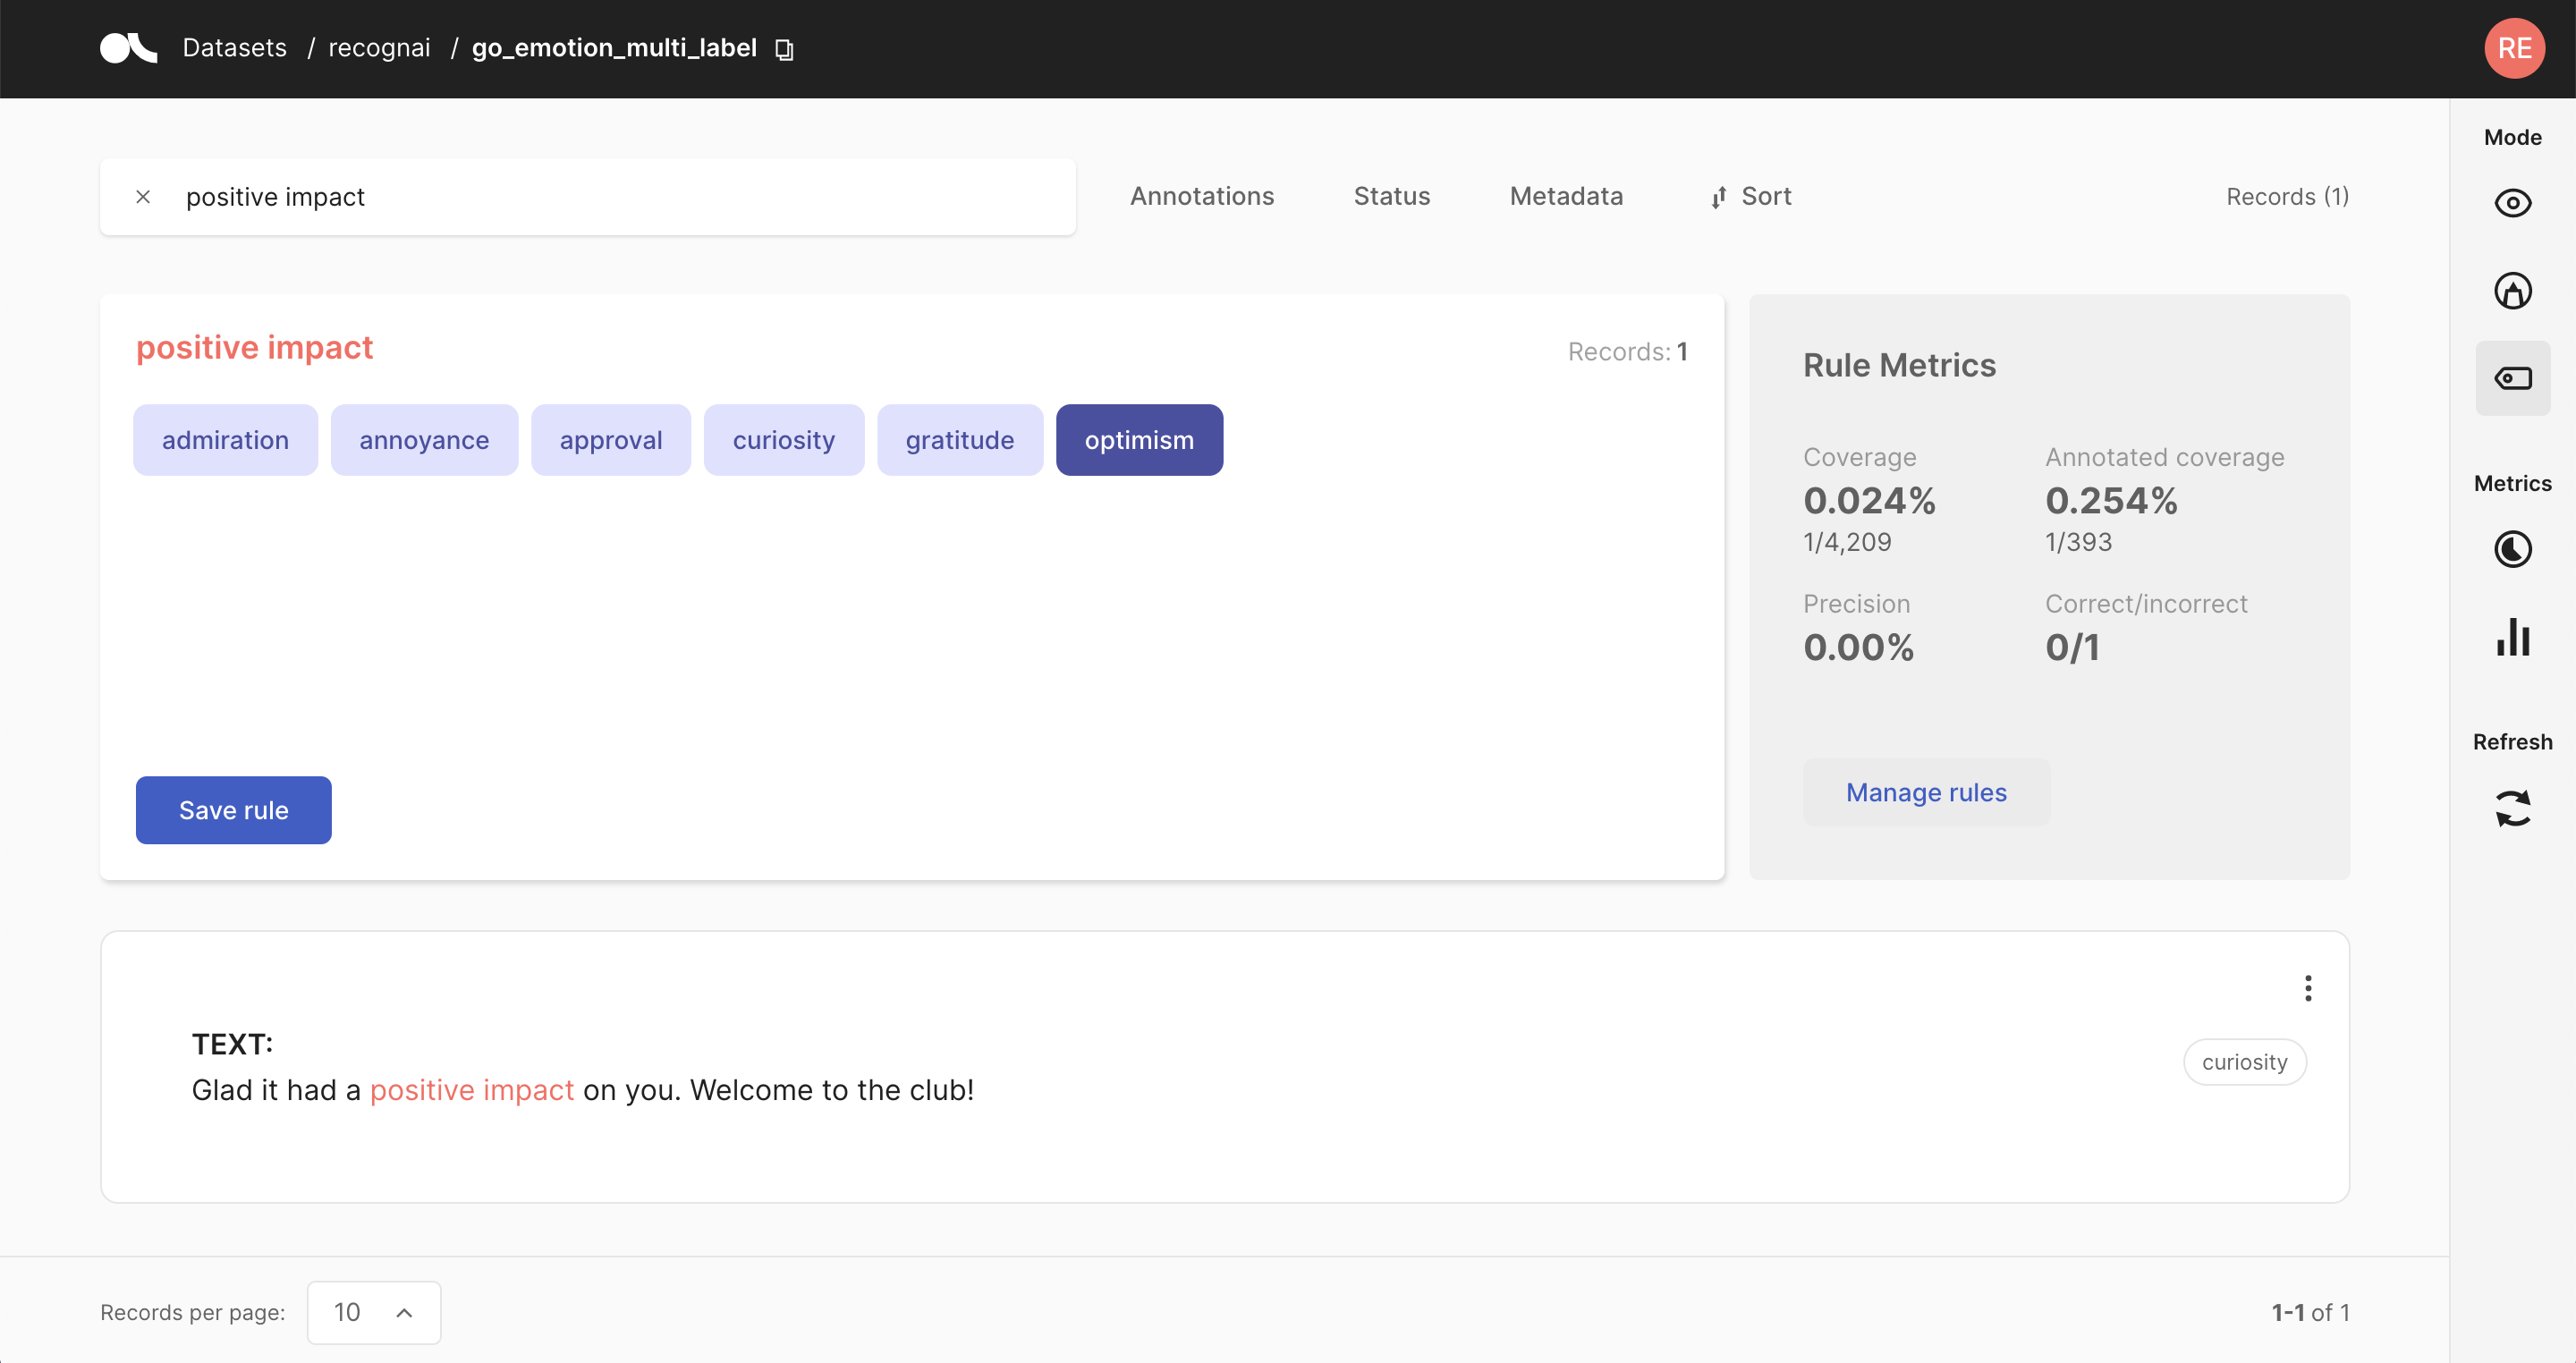
Query plus labels#
A rule in Argilla basically applies a chosen set of labels to a list of records that match a given query, so all you need is a query plus labels. After entering a query in the search bar and selecting one or multiple labels, you will see some metrics for the rule on the right and the matches of your query in the record list below.
Warning
Filters are not part of the rule but are applied to the record list. This means that if you have filters set, the record list does not necessarily correspond to the records affected by the rule.
If you are happy with the metrics and/or the matching record list, you can save the rule by clicking on “Save rule”. In this way, it will be stored as part of the current dataset and can be accessed via the manage rules button.
Hint
If you want to add labels to the available list of labels, you can go to your Dataset Settings page and create new labels there.
Rule Metrics#
After entering a query and selecting labels, Argilla provides you with some key metrics about the rule. Some metrics are only available if your dataset has also annotated records.
Coverage: Percentage of records labeled by the rule.
Annotated coverage: Percentage of annotated records labeled by the rule.
Correct/incorrect: Number of labels the rule predicted correctly/incorrectly with respect to the annotations.
Precision: Percentage of correct labels given by the rule with respect to the annotations.
Note
For multi-label classification tasks, we only count wrongly predicted labels as incorrect, not labels that the rule misses.
Overall rule metrics#
From the right sidebar you can access the Overall rule metrics. Here you will find the aggregated metrics, such as the coverages, the average precision and the total number of correctly/incorrectly predicted labels. You can also find an overview of how many rules you saved and how they are distributed with respect to their labels.
Hint
If you struggle to increase the overall coverage, try to filter for the records that are not covered by your rules via the Annotation filter.
Manage rules#
Here you will see a list of your saved rules. You can edit a rule by clicking on its name, or delete it by clicking on the trash icon.