User Management#
This guide explains how to set up and manage the users in Argilla via the Python client and the CLI.
Note
The User class for user management has been included as of the Argilla 1.11.0 release and is not available in previous versions. But you will be able to use it with older Argilla instances, from 1.6.0 onwards, the only difference will be that the main role is now owner instead of admin.
Warning
As of Argilla 1.11.0, the default pool of users in the quickstart contains also an owner user which uses the credentials: username owner, password 12345678, and API key owner.apikey; while for the server image the default user is now an owner instead of an admin with the same credentials: username argilla, password 1234 and API key argilla.apikey.
User Model#
A user in Argilla is an authorized person who can access the UI and use the Python client and CLI in a running Argilla instance.
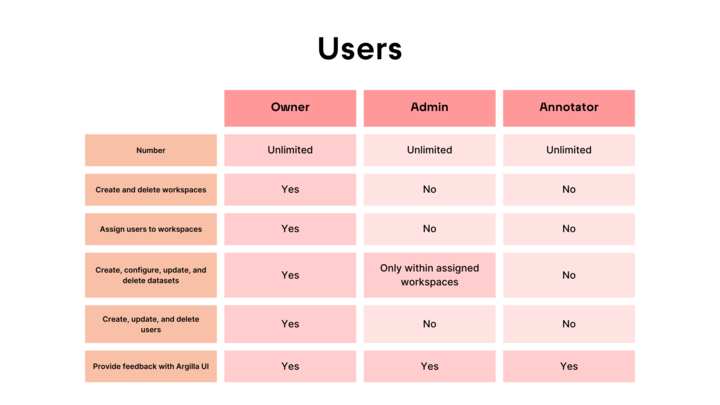
We differentiate between three types of users depending on their role, permissions, and needs: owner, admin, annotator.
Owner#
The owner is the root user who created the Argilla instance. When working with Argilla, it is very useful to work with workspaces. So, the owner has full access to all workspaces and their options:
An Argilla user is composed of the following attributes:
Workspace management: It can create and delete a workspace.
User management: It can create a new user, update its information, assign a workspace to a user, and delete a user. It can also list all of them and search for a specific user by its name or ID.
Dataset management: It can create, configure, update, and delete datasets. It can also delete the current FeedbackDataset from Argilla.
Annotation: It can annotate datasets in the Argilla UI.
Feedback: It can provide feedback with the Argilla UI.
Admin#
An admin user can only access the workspaces it has been assigned to and cannot assign other users to it. An admin user has the following permissions:
Dataset management: It can create, configure, update, and delete datasets (including FeedbackDataset) only on assigned workspaces.
Annotation: It can annotate datasets in the assigned workspaces via the Argilla UI.
Feedback: It can provide feedback with the Argilla UI.
Annotator#
An annotator user is limited to accessing only the datasets assigned to it within the workspace. It has two specific permissions:
Annotation: It can annotate datasets in the Argilla UI.
Feedback: It can provide feedback with the Argilla UI.
An Argilla user is composed of the following attributes:
Attribute |
Type |
Description |
|---|---|---|
|
|
The unique identifier of the user. |
|
|
The username used as login for Argilla’s UI. |
|
|
The user’s first name. |
|
|
The user’s last name. |
|
|
The user’s full name, which is the concatenation of |
|
|
The user’s role in Argilla. Available roles are: “owner”, “admin” and “annotator”. |
|
|
The workspace names where the user has read and write access (both from the UI and the Python client). |
|
|
The API key to interact with Argilla API, mainly through the Python client but also via HTTP for advanced users. It is automatically generated when a user is created. |
|
|
The date and time when the user was created. |
|
|
The date and time when the user was last updated. |
Python client#
The User class in the Python client gives developers with owner role the ability to create and manage users in Argilla. Check the User - Python Reference to see the attributes, arguments, and methods of the User class.
How to guide#
Note
To connect to an old Argilla instance (<1.3.0) using newer clients, you should specify the default user API key rubrix.apikey. Otherwise, connections will fail with an Unauthorized server error.
Get the currently active User#
You can get the currently active user in Argilla using the me classmethod in the User class. Note that the me method will return the active user as specified via the credentials provided via rg.init. Also, it is possible to set this information using environment variables, which allows for skipping rg.init.
argilla login --api-url http://localhost:6900
argilla whoami
import argilla as rg

rg.init(api_url="<ARGILLA_API_URL>", api_key="<ARGILLA_API_KEY>")

user = rg.User.me()
Create a User#
You can create a new user in Argilla using the create command in the users group.
argilla users create
So for example, to create a new user with admin role and member of ws1 and ws2 workspaces, you can run the following command:
argilla users create --username new-user --password new-password --first-name New --last-name User --role admin --workspace ws1 --workspace ws2
You can also create a new user in Argilla using the create classmethod in the User class. The provided workspaces must exist in Argilla.
import argilla as rg

rg.init(api_url="<ARGILLA_API_URL>", api_key="<ARGILLA_API_KEY>")

user = rg.User.create(
    username="new-user",
    first_name="New",
    last_name="User",
    password="new-password",
    role="admin",
    workspaces=["ws1", "ws2"]
)
Update a User#
You can change the assigned role for an existing user using the database connection, therefore the environment variable ARGILLA_DATABASE_URL must be set unless you’re using SQLite in which case you should be executing the command from the machine where the Argilla server is running.
argilla server database users update argilla --role owner
User 'argilla' successfully updated:
• role: 'admin' -> 'owner'
Note
You should use this command to review and migrate user roles from version <=1.10.0
Get a User by username#
Python client#
You can get a user by username using the from_name classmethod in the User class.
import argilla as rg

rg.init(api_url="<API_URL>", api_key="<OWNER_API_KEY>")

user = rg.User.from_name("new-user")
Get a User by id#
Python client#
You can get a user by id using the from_id classmethod in the User class.
import argilla as rg

rg.init(api_url="<ARGILLA_API_URL>", api_key="<ARGILLA_API_KEY>")

user = rg.User.from_id("new-user")
Assign a User to a Workspace#
You can assign a user to a workspace using the add-user command in the workspace group.
argilla workspace --name ws1 add-user nick
To assign a user to a workspace, you can use the add_user method in the Workspace class. For more information about workspaces, see the Workspace Management guide.
import argilla as rg

rg.init(api_url="<API_URL>", api_key="<OWNER_API_KEY>")

user = rg.User.create(
    username="nick",
    first_name="Nick",
    last_name="Name",
    password="11223344",
    role="annotator",
)

workspace = rg.Workspace.create(name="ws")
workspace.add_user(user.id)
List Users#
Note
Just the “owner” can list all the users in Argilla.
You can list all the existing users in Argilla using the list command in the users group.
argilla users list
You can list all the existing users in Argilla by calling the list classmethod of the User class.
import argilla as rg

rg.init(api_url="<API_URL>", api_key="<OWNER_API_KEY>")

users = rg.User.list()
Delete a User#
Note
Just the “owner” can delete users in Argilla.
You can delete an existing user in Argilla using the delete command in the users group.
argilla users --username existing-user delete
You can delete an existing user from Argilla by calling the delete method on the User class.
import argilla as rg

rg.init(api_url="<ARGILLA_API_URL>", api_key="<ARGILLA_API_KEY>")

user = rg.User.from_name("existing-user")
user.delete()
Default user for the argilla/argilla-server Docker image#
If you’re using the argilla/argilla-server Docker image, you can create the default user argilla with owner role by setting the following environment variables:
DEFAULT_USER_ENABLED: Set totrueto enable the default user creation.DEFAULT_USER_PASSWORD: IfDEFAULT_USER_ENABLEDis set totrue, this environment variable must be set to the password for the default user.DEFAULT_USER_API_KEY: IfDEFAULT_USER_ENABLEDis set totrue, this environment variable must be set to the API key for the default user.
Migrate users from the users.yaml file#
The migration command can create users and workspaces automatically from a YAML file with the following format:
- username: john
  full_name: John Doe
  email: john@argilla.io
  api_key: a14427ea-9197-11ec-b909-0242ac120002
  hashed_password: $2y$05$xtl7iy3bpqchUwiQMjEHe.tY7OaIjDrg43W3TB4EHQ7izvdjvGtPS
  disabled: False

- username: tanya
  full_name: Tanya Franklin
  email: tanya@argilla.io
  api_key: 78a10b53-8db7-4ab5-9e9e-fbd4b7e76551
  hashed_password: $2y$05$aqNyXcXRXddNj5toZwT0HugHqKZypvqlBAkZviAGGbsAC8oTj/P5K
  workspaces: [argilla, team]
  disabled: True

- username: daisy
  full_name: Daisy Gonzalez
  email: daisy@argilla.io
  api_key: a8168929-8668-494c-b7a5-98cd35740d9b
  hashed_password: $2y$05$l83IhUs4ZDaxsgZ/P12FO.RFTi2wKQ2AxMK2vYtLx//yKramuCcZG
  workspaces: [argilla, team, latam]
  disabled: False
To do so, the command will connect to the Argilla server database directly, therefore the environment variable ARGILLA_DATABASE_URL must be set unless you’re using SQLite in which case you should be executing the command from the machine where Argilla server is running.
The user role will be computed depending on how workspaces are set up for each user. If no workspace attribute is defined, the user will be considered an owner. Otherwise, the assigned user role will be annotator.
The task will also create an extra workspace for each user named after their username.
export ARGILLA_LOCAL_AUTH_USERS_DB_FILE=/path/to/.users.yml
argilla server database users migrate
Starting users migration process using file '.users.yml'
Migrating User with username 'john'
Migrating User with username 'tanya'
Migrating User with username 'daisy'
Users migration process successfully finished
Ensure everything went as expected logging in and listing the users via the CLI:
argilla users list
Migrate users with Docker Compose#
Make sure you create the YAML file above in the same folder as your docker-compose.yaml. You can download the docker-compose.yaml file from this URL:
Then open the provided docker-compose.yaml file and modify your Argilla instance as follows:
  argilla:
    image: argilla/argilla-server:latest
    restart: unless-stopped
    ports:
      - "6900:6900"
    environment:
      ARGILLA_HOME_PATH: /var/lib/argilla
      ARGILLA_ELASTICSEARCH: http://elasticsearch:9200
      ARGILLA_AUTH_SECRET_KEY: ${ARGILLA_AUTH_SECRET_KEY:? Please generate a 32 character random string with `openssl rand -hex 32`}
+     ARGILLA_LOCAL_AUTH_USERS_DB_FILE: /var/lib/argilla-migrate/users.yaml
    networks:
      - argilla
    volumes:
      - argilladata:/var/lib/argilla
+     - ${PWD}/users.yaml:/var/lib/argilla-migrate/users.yaml
After that change you can start the containers with:
docker-compose up
And, after running the containers you can run the task to migrate the users as follows:
docker-compose exec argilla argilla server database users migrate
If everything goes well, the configured users can now log in, their annotations will be tracked with their usernames, and they’ll have access to the defined workspaces.